Maintenance
4 313347C
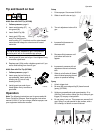
Clearing RAC Tip Clogs (257096)
1. Relieve pressure. Set trigger lock (A).
2. Rotate tip (B) 180°. Unlock trigger lock (A). Trigger
gun into pail or onto ground to remove clog.
3. Set trigger lock (A). Rotate tip (B) 180° back to spray
position.
Maintenance
Before performing any maintenance on gun, read all
warnings on front cover of this manual and relieve
pressure.
Daily Maintenance
Flush gun after each work shift and store in a dry location.
Do not immerse the gun or any parts in water or cleaning
solvents.
• Do not point gun up while cleaning it.
• Do not wipe gun with cloth soaked in solvent; wring
out excess.
• Solvent left in gun air passages could result in a poor
quality paint finish. Do not use any cleaning method
that may allow solvent into gun air passages.
Flushing and Cleaning
• Flush gun before changing colors, before storing and before
repairing gun.
• Flush at lowest possible pressure. Check connectors for
leaks and tighten as necessary.
• Flush with fluid compatible with fluid being dispensed and
equipment wetted parts.
1. Relieve pressure. Unplug sprayer.
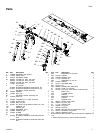
2. Remove tip (28) and guard (29).
3. Remove sprayer siphon tube set from paint and place
in flushing fluid. See Cleanup instructions in sprayer
operation manual 313316.
4. Plug sprayer in outlet. Set sprayer function selection
switch to AIRLESS or ON.
5. Increase pressure slowly. Point gun down into
grounded metal container. Pull gun trigger and flush
gun with solvent until all traces of fluid are removed
from gun passages.
6. Turn sprayer function selection switch to OFF.
7. Relieve pressure, page 2.
8. Disconnect fluid supply hose from gun.
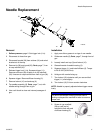
9. If it is necessary to remove diffuser (5) to clean, follow
Needle Replacement Removal procedure, steps 1
through 6.
10. Dip soft-bristle brush into a compatible solvent. Do
not use a wire brush.
11. Point gun down, clean front of gun with soft-bristle
brush and solvent.
12. Scrub tip (28) and guard (29) with soft-bristle brush.
Clean air cap holes with a toothpick to avoid
damaging critical surfaces. Blow air through spray tip
(28) to ensure orifice is clean.
13. If diffuser (5) was removed, trigger gun while you
reinstall diffuser. Torque to 26-32 ft-lb (36-40 N•m).
When properly tightened, flange bottoms out on gun.
14. Install air cap manifold; follow Needle Replacement
Installation procedure, steps 9 - 13.
15. Install tip (28) and guard (29) on gun, page 2.
16. Wipe off outside of gun with soft cloth dampened in
solvent,
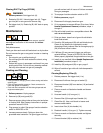
Cleaning/Replacing Filter (6)
1. Relieve pressure. Set trigger lock (11a).
2. Disconnect fluid hose from gun at swivel (5).
3. Disconnect bracket (36) from retainer (16) and swivel
out of way.
4. Place a wrench on flats below handle and loosen
from gun.
5. Unscrew handle (14) from gun (1).
6. Remove filter (6) through top of handle (14).
7. Clean filter (6). Use a soft brush to loosen and
remove excess debris.
8. Insert clean filter (6) into handle (14).
9. Reattach handle (14) to gun (1). Tighten securely.
10. Place a wrench on flats below handle and tighten
securely.
11. Connect bracket (36) to retainer (16).
WARNING


