


2 311861G
Pressure Relief Procedure
Follow this Pressure Relief Procedure whenever instructed
to relieve pressure, stop spraying, check or service equipment,
or install or clean spray tip.
1. Turn OFF power and turn sprayer pressure control to low-
est pressure setting.
2. Hold gun against side of flushing pail. Trigger gun into pail
to relieve pressure.
If you suspect spray tip or hose is clogged or that pressure has
not been fully relieved after following the steps above, VERY
SLOWLY loosen tip guard retaining nut or hose end coupling
to relieve pressure gradually, then loosen completely. Clear
hose or tip obstruction.
Gun Trigger Lock (2)
Setup
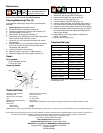
Connect Gun to Sprayer
1. Attach supply hose to sprayer fluid outlet.
2. Attach other end of supply hose to gun swivel (8). Use two
wrenches (one on the swivel (8) and one on the hose), to
tighten all connections securely.
3. Refer to sprayer instruction manual for priming
instructions.
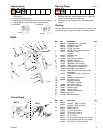
Installing Tip (26) and Guard (25) on Gun
1. If equipment has recently been operated, relieve pres-
sure. Set trigger lock (2).
2. Using a pencil or similar object, insert seal (24) into back
of guard (25).
3. Install guard (25) over end of gun (1).
4. Insert tip (26) in guard (25). Tighten retaining nut.
Operation
Spraying
1. Unlock trigger lock (2).
2. Be sure the arrow shaped tip (26) faces forward (spray).
3. Hold gun perpendicular and approximately 12-inches
(304 mm) from surface. Move gun first, then pull gun
trigger (13) to spray a test pattern.
4. Slowly increase pump pressure until coverage is uniform
and even (see sprayer instruction manual for additional
information).
WARNING
EQUIPMENT MISUSE HAZARD
Misuse can cause death or serious injury.
• Do not operate the unit when fatigued or under the influence of drugs or alcohol.
• Do not exceed the maximum working pressure or temperature rating of the lowest rated system component. See
Technical Data in all equipment manuals.
• Use fluids and solvents that are compatible with equipment wetted parts. See Technical Data in all equipment
manuals. Read fluid and solvent manufacturer’s warnings. For complete information about your material,
request MSDS forms from distributor or retailer.
• Check equipment daily. Repair or replace worn or damaged parts immediately with genuine manufacturer’s
replacement parts only.
• Do not alter or modify equipment.
• Use equipment only for its intended purpose. Call your distributor for information.
• Route hoses and cables away from traffic areas, sharp edges, moving parts, and hot surfaces.
• Do not kink or over bend hoses or use hoses to pull equipment.
• Keep children and animals away from work area.
• Comply with all applicable safety regulations.
PERSONAL PROTECTIVE EQUIPMENT
You must wear appropriate protective equipment when operating, servicing, or in the operating area of the equip-
ment to help protect you from serious injury. This equipment includes but is not limited to:
• Protective eyewear, gloves, hearing protection
• Clothing and respirator as recommended by the fluid and solvent manufacturer
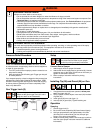
To prevent injury when the gun is not in use,
always set the gun’s trigger lock (2) if unit is
being shut down or left unattended.
Trigger Locked
Tr igge r
ti10166a ti10167a
(no spray)
(spray)
Unlocked
Make sure sprayer is turned off and unplugged
from power source. Refer to your sprayer
manual for priming and spray instructions.