


Service
8 312388K
Service
Preparation
1. Flush and clean gun before servicing.
2. Follow Pressure Relief Procedure,
page 5.
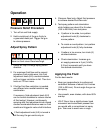
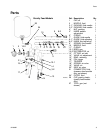
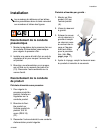
Air Cap, Nozzle, and Needle
1. Unscrew air cap (1).
2. Trigger gun while you remove the
nozzle (2) with gun tool (27).
3. Remove fluid adjustment knob (8-2) and
spring (9).
4. Pull fluid needle (10) out the back of the
gun.
Air Valve and Needle Packings
1. Remove retaining rings (15), pin (16), and
trigger (17).
2. Remove packing nut (4) and fluid needle
packings (3-1, 3-2).
3. Remove fluid needle guide (7).
4. Remove fluid adjusting guide (8-1).
5. Remove spring (18) and air valve (19).
6. Remove air valve seat (20) and o-rings.
7. Replace parts as needed.
8. Assemble gun in reverse order. Lubricate
needle and o-rings. Be sure to trigger gun
when installing nozzle (2).
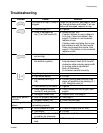
Fluid leaking from
packing nut (4).
a. Packing nut (4) loose. a. Tighten, but not so tight as to grip
needle.
b. Packing (3-1, 3-2) worn or
dry.
b. Lubricate or replace.
Fluid nozzle (2)
dripping.
a. Dry packing (3-1, 3-2). a. Lubricate.
b. Sluggish needle (10). b. Clean and lubricate.
c. Packing nut (4) too tight. c. Loosen.
d. Worn fluid nozzle or
needle.
d. Replace.
Thin, coarse finish. a. Gun held too far from
surface.
a. Hold gun about 6 to 8 inches
(150 to 200 mm) from surface.
b. Atomization air pressure
set too high.
b. Reduce air pressure.
Thick, dimpled finish
(resembling orange
peel).
Gun held too close to surface. Hold gun about 6 to 8 inches
(150 to 200 mm) from surface.
Problem Cause Solution
Trigger gun and use gun tool (27) when-
ever you tighten or remove the nozzle (2)
to avoid damage.