


7
308612
Maintenance
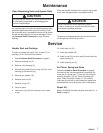
Clean Dispensing Valve and System Daily
CAUTION
Be sure that the solvent you use is compatible with
the fluid being dispensed, to avoid clogging the
valve’s fluid passages.
An important part of the care and maintenance of your
automatic dispensing valve is proper flushing. Flush
the valve daily with a compatible solvent until all traces
of fluid are removed from the valve passages. Follow
the Pressure Relief Procedure on page 5 before
flushing.
Clean the outside surfaces of the valve by wiping with
a soft cloth dampened with a compatible solvent.
CAUTION
Never immerse the entire dispensing valve in
solvent. Immersing in solvent removes lubricants
and tends to damage packings.
To remove a hardened particle from the orifice, blow
air through the orifice from the front.
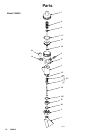
Service
Needle, Seat and Packings
To clean or replace the needle (18), its seat (17) or
packings (19 or 15), proceed as follows:
1. Follow Pressure Relief Procedure on page 5
2. Remove retaining nut (3).
3. Remove valve housing (4).
4. Remove valve seat (2) and o-ring (19) from valve
housing (4). Remove o-ring.
5. Remove gun needle (18).
6. Remove seal nut (21).
7. Remove o-ring (15).
8. Clean all parts.
9. Lubricate o-ring (15) with one drop of oil. Install
o-ring.
10. Install seal nut (21).
11. Install gun needle (18).
12. Install o-ring (19) on valve seat (2) and insert into
valve housing (4).
13. Install retaining nut (3).
Air Piston, Spring and Seals
Follow the Pressure Relief Procedure on page 5,
then remove the valve as explained, preceding. Re-
move the air cylinder cap (7), take out the spring (8)
and pull the piston (10) out. Clean and inspect all
parts. Check the piston o-rings (11, 12) carefully.
Lubricate all parts with a light waterproof grease and
reassemble the valve using new parts as necessary.
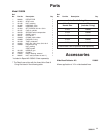
Repair Kit
Repair Kit 238340 includes the parts listed with an * in
Parts on page 11.