


2 309322D
EQUIPMENT MISUSE HAZARD
Misuse can cause death or serious injury.
• Do not operate the extension tube or roller frame or use
parts not designed for this equipment.
• Do not use 1,1,1-trichloroethane, methylene chloride,
other halogenated hydrocarbon solvents or fluids contain-
ing such solvents in pressurized aluminum equipment.
Such use can cause serious chemical reaction and equip-
ment rupture, and result in death, serious injury, and prop-
erty damage.
FIRE AND EXPLOSION HAZARD
Improper grounding, flammable fumes, such as sol-
vent and paint fumes, in work area can ignite or
explode. To help prevent fire and explosion:
• Provide fresh air ventilation to avoid the buildup of flam-
mable fumes from flushing fluids or the coating being
applied.
• Keep the application area free of debris, including solvent,
rags, and gasoline.
SKIN INJECTION HAZARD
High-pressure fluid from hose leaks, or ruptured com-
ponents will pierce skin. This may look like just a cut,
but it is a serious injury that can result in amputation. Get
immediate surgical treatment.
• Keep your hands and body away from the roller frame
when flushing. High pressure fluid emitted from the holes
in the frame could cause an injection injury.
• Always relieve pressure before you check or repair leaks
and when you turn off the pump or stop painting.
• Never use components rated less than system Maximum
Working Pressure.
PERSONAL PROTECTIVE EQUIPMENT
Failure to observe the electrical hazards described
below could result in serious injury, including burns or
electrocution. To help prevent harmful electrical shock:
• Avoid contact with power lines.
• Follow all grounding instructions in your separate pump
and gun instruction manual, and comply with all local,
state, and national fire, electrical, and safety regulations.
• Use only Graco paint hoses.
1. Follow Pressure Relief Procedure on page 1.
2. Prime pump.
3. Install roller frame.
Cleaning
This is the procedure for flushing the pressure roller. The
pump and gun you are using may have additional flushing
steps, such as cleaning filters and screens. See the pump and
gun flushing instructions.
NOTE: Leave the pressure roller attached to the gun for this
procedure.
See Pressure Relief Procedure
on page 1.
1. Relieve the pressure.
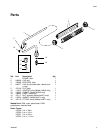
2. Remove roller cover and diffuser (3) from roller frame (1)
as follows (see Parts Drawing).
a. Use your thumb to press down on clip (5) to release
end caps (2 and 4), diffuser (3), and roller cover into a
pail.
b. Remove roller cover from diffuser (3).
c. Pull end caps (2 and 4) off diffuser (3).
3. Clean roller cover, caps (2 and 4) and diffuser (3) with
water or a compatible fluid for oil-based materials.
4. Place roller frame (1) in paint pail. Be sure the holes in
roller frame (1) are facing inside the paint pail.
5. Prim pump with water or flushing fluid for oil-based materi-
als. Use the lowest pump priming pressure setting.
6. Turn prime/spray valve to SPRAY.
NOTE: Perform step 7 at the lowest pressure possible.
7. Trigger gun until flushing fluid begins to dilute the paint.
8. Place roller frame (1) in another bucket and continue
flushing until fluid coming out of the roller frame (1) is
clear.
9. Shut off the pump. Turn prime/spray valve to PRIME.
WARNING
WARNING
Refer to your sprayer and spray gun manuals for appropriate
warnings and instructions for safe operation of this roller
frame.
Gasket (12) must be in place before installing frame (1). If
gasket is not in place, there is a potential injection hazard
which could result in serious injury.