


2 309323
Warnings and Cautions
EQUIPMENT MISUSE HAZARD
Misuse can cause the equipment to rupture or
malfunction and result in serious injury.
To help prevent injury
D Do not modify the extension tube or roller
frame or use parts not designed for this
equipment.
D Do not use 1,1,1–trichloroethane, methylene
chloride, other halogenated hydrocarbon sol-
vents or fluids containing such solvents in this or
any other pressurized aluminum equipment.
Such use could result in a chemical reaction,
with the possibility of explosion.
ELECTROCUTION HAZARD
Failure to observe the electrical hazards described
below could result in serious injury, including burns
or electrocution.
To help prevent harmful electrical shock
D Avoid contact with power lines.
D Follow all grounding instructions in your
separate pump and gun instruction manual,
and comply with all local, state, and national
fire, electrical, and safety regulations.
D Use only Graco paint hoses.
SKIN INJECTION HAZARD
If high-pressure fluid pierces your skin, the injury
might look like “just a cut”. But it is a serious
wound. Get immediate surgical treatment.
To help prevent injection
D Keep your hands and body away form the
roller frame when flushing. High pressure
fluid emitted from the holes in the frame
could cause an injection injury.
D Always relieve pressure before you check or
repair leaks and when you turn off pump or stop
painting.
D Never use components rated less than system
Maximum Working Pressure.
INSTRUCTIONS
FIRE AND EXPLOSION HAZARD
Improper grounding, poor ventilation, open
flames or sparks can cause a hazardous
condition and result in a fire or explosion and
serious injury.
To help prevent injury from fire or explosion
D Provide fresh air ventilation to avoid the
buildup of flammable fumes from flushing
fluids or the coating being applied.
D Keep the application area free of debris,
including solvent, rags, and gasoline.
WARNING
Additional Roller Covers
The following pressure roller covers are available at
your local distributor:
107589 9 in. (23 cm); 3/8 in. (9.5 mm) nap
107590 9 in. (23 cm); 1/2 in. (13 mm) nap
107591 9 in. (23 cm); 3/4 in. (19 mm) nap
107592 9 in. (23 cm); 1-1/4 in. (32 mm) nap
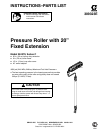
Installation
Assemble the pressure roller as shown in the Parts
Drawing on page 3. Attach pressure roller assembly
to spray gun.
Pressure Relief Procedure
WARNING
To help prevent injection injuries,
follow this procedure whenever
you stop painting.
psi/MPa/bar
1. Put gun trigger safety in SAFETY ON position.
2. Shut off power to pump.
3. Turn prime/spray valve to the PRIME position to
relieve pressure in system.
4. Put gun trigger safety in SAFETY OFF position,
and trigger gun to relieve any pressure in hose.
5. Put gun trigger safety in SAFETY ON position, and
keep pump prime/spray valve in PRIME position
until you paint again.
Operation
1. Follow pump priming instructions using lowest
pressure setting at which pump primes.
2. Turn prime/spray valve to SPRAY position.
3. Disengage gun safety latch, trigger the gun, and
roll the surface until paint comes to roller.
NOTE: Trigger the gun briefly only when you need
more paint. Determine how often you must trigger
the gun to maintain an even paint supply to the
roller.
4. Increase pump pressure only if triggering gun
cannot supply enough paint for your rolling speed.
See Pressure Relief
Procedure on page 2.
5. Whenever you stop painting, relieve the
pressure, and elevate roller end of extension tube
to prevent paint from draining out.
Flush the pump, gun, and pressure roller immediately
after each use to prevent paint from drying in the
pressure roller and damaging it. See Cleaning on
page 3.