


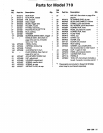

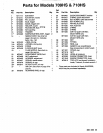

Service
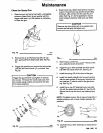
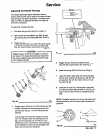
Lubricating the Spray
Gun
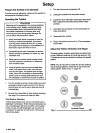
After cleaning or servicing the gun, lubricate the parts
indicated in Fig.
23
with silicone-free spray gun lubri-
cant or similar material. See page
26
to order lubri-
cant.
0
All
threaded areas (A)
0
Trigger screws
(8)
0
Trigger
axle
(C)
0
Fluid needle assembly
(D)
-
where indicated
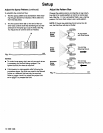
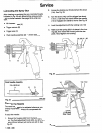
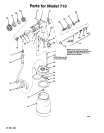
2.
Loosen the locking nut (14d) and turn the drum
(14c). See Fig.
25.
3.
Turn the drum (14c) until the trigger has about
1/16 in.
(1.59
mm) free travel before the needle
(14) is engaged and starts to move. See Fig.
25.
4.
Lock the adjustment
with
the locking nut (14d).
5.
Make
sure
the spring
(23)
is
in place in the hous-
ing
(22),
then install the housing with the other
parts. Hand-tighten the housing.
~
Fluid
Needle
Assembly
2
in.
(50.8
mm)
02949.
om
Fig.
23
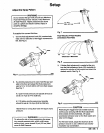
Adjusting the Needle
The needle may need to be adjusted whenever you
change nozzle/needle sizes or to compensate for
wear.
To
adjust
the
needle:
1.
Remove the housing
(22)
from the back of the
gun. The fluid adjustment knob
(20),
nut
(21),
and
spring (23-not shown) will come out with it. See
Fig.
24.
16 308-336
Fig.
24
Fig.
25
02857