


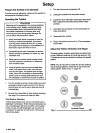
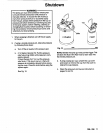


Maintenance
WARNING
The spray gun cups and accessory remote pres-
sure pots remain pressurized until pressure is
manually relieved. To reduce the risk of serious
injury from pressurized fluid or accidental spray
from the gun, always relieve pressure in the cup or
pressure pot before checking or servicing any part
of the spray system; before installing, cleaning or
changing fluid nozzles; before loosening or remov-
whenever you stop spraying.
ing the accessory remote pressure pot cover; and
NOTES
0
Check for any fluid leakage from the gun and fluid
hoses. Tighten fittings or replace equipment as
needed.
Flush the gun before changing colors and when-
ever you are done spraying.
CAUTION
fluid being sprayed and compatible with the spray
Clean all parts with a solvent Compatible with the
gun and cup or accessory remote pressure pot
wetted parts. See the Technical
Data
on the back
cover.
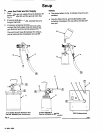
Flushing the Spray Gun Using
a
Remote
Pressure Pot
1.
Turn
off
the air supply to the gun.
2.
Relieve the pressure pot pressure by following
these steps:
a. Turn
off
the air supply to the pressure pot.
b.
2
7/2
Gallon
Remote Pot: Pull the pressure
relief valve ring (206c) until pressure
is
com-
2
Quart
Remote
Pot:
Turn out the pressure
pletely relieved.
relief knob
(113)
about one turn. Wait until
pressure
is
completely relieved before remov-
ing the cover. Close the knob before using the
system again.
See Fig.
12,
page
11.
3.
Fill the pressure pot with compatible solvent.
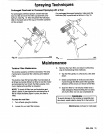
4.
Turn the air cap to the round pattern position and
turn the air control valve
so
it's
haif open to
reduce
the
solvent mist. See Fig.
17.
5.
Flush the spray gun, using compressor air only.
Point the gun down into a container and flush
until the solvent runs clean.
14
308-336
6.
Relieve the pressure pot pressure, following
steps
2.a and b, above.
7.
Disconnect the air and fluid hoses from the gun.
8.
Clean and lubricate
the
gun
as
instructed on
pages
15
and
16.
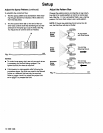
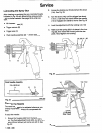
Flushing the Spray Gun
and
Cup
1.
Turn
off
the air supply to the gun.
2.
Unlatch the cup cover and remove the cup from
the cover.
3.
Turn the air cap to the round pattern position and
turn the air control valve
so
it's half open to
reduce the solvent mist.
See
Fig.
17.
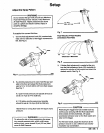
@
Alr
Cap
Round
Pattern
Posltlon
Fig.
17
1
me41
4.
Fill the empty cup with about
1-1/2
inches
(38.1
mm)
of
compatible solvent and reinstall the cup.
Be sure the cover
is
secured.
5.
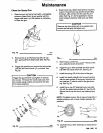
Turn on the air to the gun.
6.
Point the gun down into a container and flush
until the solvent runs clean. See Fig.
18.
Fig.
18
028u
7.
Turn
off
the air to the gun.
8.
Disconnect the air supply and remove the cup
from the gun. Clean and lubricate the gun as
instructed on pages
15
and
16.