


For complete warranty information contact your local Graco distributor, call Graco customer
service: 1-800-690-2894 or visit our website: www.graco.com.
All written and visual data contained in this document reflects the latest product information available at the time of publication.
Graco reserves the right to make changes at any time without notice.
This manual contains English. MM 311979
Graco Headquarters: Minneapolis
International Offices: Belgium, China, Japan, Korea
GRACO INC. P.O. BOX 1441 MINNEAPOLIS, MN 55440-1441
01/2007, Revised 09/2008
Maintenance
Before performing any maintenance on gun, read all warnings
on front cover of this manual and relieve pressure.
Cleaning/Replacing Filter (6)
1. Relieve pressure. Set trigger lock (3a).
2. Disconnect fluid hose from gun at swivel (5).
3. Disconnect trigger guard (4) from guard retainer (22).
4. Unscrew handle (23) from gun (21).
5. Remove filter (6) through top of handle (23).
6. Clean filter (6). Use a soft brush to loosen and remove
excess debris.
7. Insert clean filter (6) into handle (7).
8. Reattach handle (7) to gun (21). Tighten securely.
9. (Model 255109 only) If finger guard is not aligned, apply
torque manually, rotating the grip until it is aligned with the
trigger.
10. Reconnect trigger guard (4) to guard retainer (22).
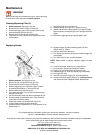
Replacing Needle
1. Relieve pressure. Set trigger lock (3a).
2. Remove tip (15) and guard (2) from gun (21).
3. Disconnect fluid hose from gun at swivel (5).
4. Release trigger lock (3a). Squeeze trigger (3) while
unscrewing seat diffuser (1) from front of gun.
5. Remove locknut (9) and end cap (8).
6. Tap needle assembly (13) out, with the needle exiting
through front of gun.
7. Use a soft brush to clean out internal passages of gun.
8. Grease outside of needle seal and in front of locknut
thread with non-silicon grease.
9. Guide new needle (13) through front of gun (21).
10. Loosely install end cap (8) and locknut (9).
11. Grease threads of diffuser/seat (1). Place gasket (12) on
diffuser/seat (1).
12. Squeeze trigger (3) while installing gasket (12) and
diffuser seat (1). Torque.
13. Hold gun with nozzle facing up.
14. Turn locknut (9) clockwise until you see and feel trigger (3)
raise slightly.
15. Turn locknut (9) 3/4 turn counter-clockwise.
NOTE: When needle is properly adjusted, trigger will move
freely.
16. Connect fluid hose. Install tip (15) and guard (2).
17. Prime sprayer. See sprayer instruction manual.
18. Trigger gun into bucket until fluid flows from gun.
19. Release trigger (3). Fluid flow should stop immediately.
20. Set trigger lock (3a).
21. Aim gun into bucket. Trigger gun. No fluid show flow.
22. If the gun fails tests, steps 19 and/or 21, relieve pressure
and disconnect hose. Readjust needle. Repeat tests.
WARNING
ti9211a
8