


G5968/9 Angle Grinder
OPERATION INSTRUCTIONS
-4-
Selecting Abrasive
The best results from your Model G5968/9
Angle Grinder will be accomplished using
the proper grit abrasive. As a rule, you will
want to start with a more coarse grinding or
sanding grit for removing large defects or
rough spots, then work through finer grits
until you achieve the smoothness and
quality you desire.
With the disc you have determined to be
sufficient for the job, and having a firm grip
on the grinder, squeeze the trigger and
grind the work evenly. Always keep the
grinder moving to prevent gouge marks. If
you stay in one place too long, then the
grinder will produce a depression in the
work that will compromise your finish.
Experiment in a small corner or area that is
not very noticeable on your project. Ideally,
you want to achieve the balance of remov-
ing defects without damaging your work.
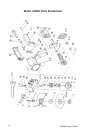
Installing Abrasive Disc or
Attachments
Make sure the grinder is disconnected
from the power source and remove the
spanner nut. Place the grinding disc or
attachment over the arbor and secure it
with the spanner nut. Using the wrenches
provided, hold the arbor with the wrench
and tighten the spanner nut with the span-
ner wrench. To remove abrasive discs, or
attachments, follow the steps just per-
formed. Note—Model G5968 has a spindle
lock button so a wrench is not necessary
on the arbor. Just push the spindle lock
button on the top of the grinder to lock the
spindle and use the spanner wrench to
tighten or loosen the spanner nut
.
Using the Grinder
• Inspect grinding disc for flaws. Never
use a chipped or broken disc.
• Use only grinding discs made for this
grinder. Never use a disc that requires
modifications to the grinder.
• Never operate grinder without the
guard in place.
• Pay attention to the direction the sparks
are going while grinding. Flamable
material must be kept at a safe dis-
tance while grinding.
• Make sure workpiece is secure. Use a
vice or clamps when working with
smaller workpieces.
• Always use two hands to hold the
grinder.
• Never apply excessive force while
grinding. Your grinder will last longer if
you let “it” do the work. Using slight
pressure barely greater than the weight
of the equipment is ideal because you
can still maintain control.
• For added control and comfort, a lock-
on trigger switch is installed. The lock-
on trigger switch is easy to operate—
simply squeeze the trigger and push in
the locking pin. To release the trigger,
press the trigger in, then release to dis-
engage the trigger lock.