


G9003 Portable Planer
-7-
The Planer comes with the blades already
installed. Check the blades before the first
use to make sure they are set properly.
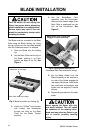
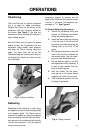
To Check Blade Height Setting:
1. Lay a straightedge across the
Rear Foot and the Cutterhead. Do
not position the straightedge so it
contacts the Front Foot. See
Figure 2.
BLADE ADJUSTMENT & REMOVAL
Figure 2. Checking Blade height.
2. Rotate the Cutterhead manually
with the exposed portion of the belt
(right next to the Cutterhead). The
tip of the blade at its highest point
should just barely touch the
straightedge. Move the straight-
edge back and forth across the
width of the blade to make sure
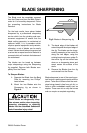
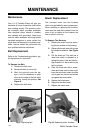
Figure 3. Removing Blade Holder bolts.
the amount of contact is the same
all the way across.
3. If there is too much contact, or
none at all, at any point across the
blade, then the blade needs to be
reset. Refer to Blade Installation
Section.
4. Repeat procedure for the other
Blade.
To Remove the Blade Assemblies:
1. Using the belt pulley, rotate the
Cutterhead so that one of the two
Blade Holders is positioned in the
opening in the base.
2. Use the supplied T-handle wrench
to remove the three hex head bolts
holding the Blade Assemblies to
the Cutterhead. Hold the
Cutterhead in position with the Belt
Pulley. See Figure 3.
3. Lift the Blade Holder and Blade
Assembly off, being careful to not
come in contact with the sharp
edge of the blade.
4. Repeat procedure for the other
Blade.
Turn the switch off and unplug the
Planer from power before attempting
blade removal or any adjustments.
Serious injury may occur if the unit
should be accidentally started while
checking or removing the blades.