G9247 Mini Wood Lathe
-5-
CONTROL PANEL OPERATION
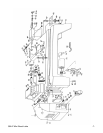
The Control Panel consists of ON/OFF buttons, fuse access, and a Variable Speed Knob (#20). To turn the
lathe on, push up on the Red button. To turn the lathe off, Press down the Red button. The Variable Speed
Knob can be adjusted from 0 to 4500 RPM. To access the fuse, use a Phillips head screwdriver to remove
the fuse cover.
TURNING BETWEEN CENTERS
1. It is suggested that you start with a small work piece for practicing wood lathe operation. Select a 2"
x 2" piece of wood (8” long). Draw diagonal lines on each end to locate the center. Place the center
point of one end of the wood on the Cup Center (#46). Place a piece of wood on the end of the Cup
Center for protection, and using a wooden mallet, drive the Cup Center into the wood. Remove the
Cup Center and drive the Spur Center (#30) into the other end of the workpiece. Remove the Spur
Center.
2. Insert the Spur Center into the Headstock Casting (#26), and the Cup Center into the Tailstock
Casting (#59), and tap them lightly with a piece of wood. Place your workpiece between the Spur
Center and the Cup Center, and lock the Tailstock.
3. Move the Cup Center into the workpiece by turning the Head Wheel (#63). Make sure that the Spur
Center and the Cup Center are holding the workpiece in the end center points marked above.
4. Adjust the Tool Rest (#40) so that the top of the Tool Rest is
1
/8" away from the corners of the work-
piece and
1
/
8" above the centerline of the workpiece. Rotate the workpiece by hand to make sure no
portion of the workpiece touches the Tool Rest.
5. Before turning on the Mini Wood Lathe, put the Speed Control Knob in position “0”. Turn the Red but-
ton to start the lathe and slowly rotate the Speed Control Knob clockwise to increase the Spindle
speed. If you are uncertain about the optimal spindle speed, it is better to start with the slowest RPM
and increase the speed as your comfort with the lathe and the workpiece increases.
6. Positioning the Tool Rest for cutting:
When cutting, the object is to pierce the outer skin of the workpiece to a certain designed
depth, then hold the cutting tool steady with the beveled edge parallel to the work cir-
cumference. In this manner, the cutting tool will shove the workpiece at the desired depth.
The best way to hold the cutting tool steady is to rest it on the Tool Rest. The Tool Rest
will act as a fulcrum point to support the cutting tool against the downward force of the
revolving workpiece.
Operation of this equipment has the poten-
tial to propel debris into the air which can
cause eye injury. Always wear safety glass-
es or goggles when operating equipment.
Everyday glasses or reading glasses only
have impact resistant lenses, they are not
safety glasses. Be certain the safety glass-
es you wear meet the appropriate stan-
dards of the American National Standards
Institute (ANSI).


