


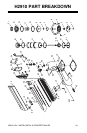
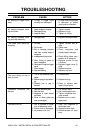

H2910 3-IN-1 WOOD, METAL & CONCRETE NAILER-7-
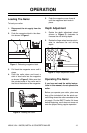
To operate your nailer:
1. Connect the air supply to the quick
connect fitting.
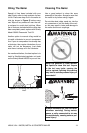
2. Test the loaded nailer for proper pen-
etration. Hold the nailer perpendicular
to the surface of a piece of clean
scrap wood that is thick enough for
the length of nails you have loaded.
Depress the safety yoke mechanism
on your workpiece.
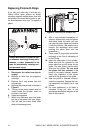
3. Before pressing the trigger, make
sure your free hand is positioned out
of the way of a potential path of a nail
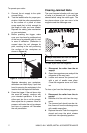
in case of deflection. (Deflection is
caused when the nail changes its
path, resulting in the nail puncturing
the surface of the workpiece as
shown in Figure 4.)
Besides damaging your workpiece,
deflection can cause injury if your free
hand is securing the workpiece in the
location that the staple/nail deflects.
4. Press the trigger. If the nail drove into
the wood far enough, continue with
your intended operations. If the nail
either went too far or not far enough,
then adjust the air pressure. More air
pressure will make the nail go deeper
and less air pressure will decrease
the nail penetration.
Figure 4. Example of nail deflection.
Always disconnect air from the nailer
whenever clearing a jam!
Clearing Jammed Nails
The most frequent situation with any type
of nailer is a jammed nail. A jam must be
cleared before using the nailer again. The
two places where a jam can occur is the
magazine and the discharge area.
To clear a jam from the discharge area:
1. Disconnect the nailer from the air
supply!
2. Remove all of the nails from the mag-
azine.
3. The jammed nail should now be visi-
ble; remove it from the discharge area
with needle nose pliers.
4. Replace the nails. Push the magazine
closed and snap the quick release
latch back into operating position.
To clear a jam from the magazine:
1. Disconnect the nailer from the air
supply!
2. Open the magazine cover and pull the
magazine all the way back.
3. Locate and remove the jammed nail
with a pair of needle nose pliers.
Close the magazine cover so it latch-
es.