


-8- H4378/H4379 Slimline Bench Grinder
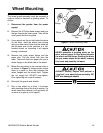
Mounting Tool Rests
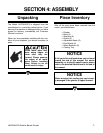
The Model H4378/H4379 weighs 22/27 lbs. Make
sure the workbench on which you plan to mount
the grinder is sturdy enough to hold the weight of
the machine and any downward pressure that
may be applied during operation. The workbench
should have a level surface and be heavy, or
attached to the floor, so it will not move during
operation. To mount the grinder:
• Pick a spot on the workbench that will allow
enough room to move the size of an antici-
pated workpiece around the grinder. The
operator (and possibly bystanders) should
have enough room to stand out of the way in
an emergency.
• Mount the grinder to the workbench with
bolts that are long enough to exceed the
thickness of your workbench and the grinder
base. Secure each bolt with flat washers, a
lock washer and a hex nut. Because sizes
vary for each individual situation, the hard-
ware in this step is not included with the
Model H4378/H4379.
• Mount the grinder in an area with proper
lighting and near electrical outlets. Lighting
should be bright enough to eliminate shadow
and prevent eye strain. Electrical circuits
should be dedicated or large enough to han-
dle amperage requirements. Keep power or
extension cords clear of high-traffic areas.
Observe local electrical codes for proper
installation of new lighting, outlets, or circuits.
Make your shop “child safe.”
Ensure that your workplace
is inaccessible to children
by closing and locking all
entrances when you are
away. Never allow visitors in
your shop when assembling,
adjusting, or operating
equipment.
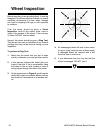
The tool rest provides a surface that can be used
to support the workpiece during grinding. Certain
types of grinding may require jigs or accessories
to assure the proper angle of the workpiece
against the wheel.
The tool rest attaches to the inward side of the
wheel guard; it should be positioned as close to
the grinding wheel as possible. Insert the
1
⁄2" x
1
⁄4"
hex bolt with a flat washer and a lock washer
through the rest support, and thread it into the
tapped hole. Repeat this installation for the oppo-
site side wheel. The tool rest can be adjusted by
loosening these bolts and moving the bracket.
Always retighten before using the machine.
Eye Shields
OSHA requires that the eye shield be positioned
between the grinding wheel and the operator’s
face during grinding. This lessens the possibility
of sparks or metal bits flying directly at the opera-
tor.
Attach each support bracket to the top end of the
wheel rim guards with the knob bolts. Note that
the brackets are slotted to allow up and down
adjustments.
Snap the eye shields into the grooves on the sup-
port brackets. The shields should be able to swiv-
el up and down.