


Maintenance
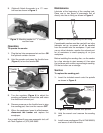
Lubricate at the beginning of the sanding task.
Place one or two drops of pneumatic tool oil
directly into the air fitting as shown in Figure
5.
Figure 5. Lubricating directly into air fitting.
Operation
To operate the sander:
1. Plug the tool into compressed air and turn ON
the optional canister vacuum.
2. Hold the sander and press the throttle lever
(Figure 4) to turn the sander ON.
Considerable caution must be used with an inline
lubricator set up, as excess oil will be expelled
from the sander onto the workpiece. If you must
use an inline lubricator, monitor the exhaust port
for oil emissions to avoid spraying oil on your
workpiece.
Before installing the sanding disc, run the sander
for a few minutes to eject excess oil, then wipe
the tool down with a clean rag and begin sanding.
Oil the tool after use or storage.
Service
To replace the sanding pad:
1. Insert the included wrench onto the spindle
as shown in
Figure 6.
3. Turn the regulator (Figure 4) to adjust the
sanding pad speed to a fixed rate, and rotate
the directional exhaust port.
4. Remove pressure on the throttle lever to stop
the sanding pad, then turn the vacuum
OFF.
5. When the sandpaper loses its effectiveness,
disconnect the sander and replace the
sandpaper.
If you need help with your new pneumatic tool, call
our Tech Support at: (570) 546-9663.
Figure 4. Sander controls.
Figure 6. Wrench inserted onto spindle.
2. Hold the wrench and unscrew the sanding
pad.
3. Install a new sanding pad (Part # PH6192039)
and secure it with the wrench.
Wrench
Sanding
Pad
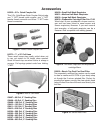
3. (Optional) Attach the sander to a 1
1
/4" vacu-
um hose as shown in
Figure 3.
Figure 3. Attaching sander to 1
1
/4" canister
vacuum hose.
Regulator
Exhaust
Port
Throttle
Lever