


-12-
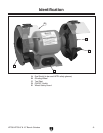
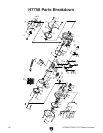
H7758/H7759 8" & 10" Bench Grinders
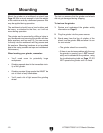
Mounting
Mount the grinder on a workbench or stand (see
Page 16) that is sturdy enough to hold the weight
of the machine and any downward pressure that
may be applied during operation.
The workbench should have a level surface and
be heavy, or attached to the floor, so it will not
move during operation.
The grinder can be mounted by drilling a holes in
your workbench and securing the grinder with hex
bolts, washers, and hex nuts. Or, you can secure
it directly into the workbench with lag screws and
flat washers. (Mounting hardware is not provided
due to the many possible set ups and workbench
thicknesses.)
When locating your grinder, remember:
• You'll need room for potentially large
workpieces.
• Grinding spreads dust in the immediate vicin
-
ity of the grinder.
• Grinding creates flying sparks that MUST be
out of reach of any flammables.
• You'll need a lot of light around the grinding
wheel.
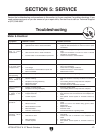
Test Run
The test run ensures that the grinder and wheels
did not get damaged during shipping.
To test run the grinder:
1. Review and understand the grinder safety
information on Page 6
.
2. Plug the grinder into the power source.
3. Stand away from the line of rotation of the
wheel, turn the grinder
ON, and allow it to run
for one minute.
—The grinder should run smoothly.
—If there is an obvious problem with the way
the grinder is running, turn it
OFF immedi-
ately and troubleshoot the problem, using
the troubleshooting table on
Page 17. DO
NOT operate the grinder until it is fixed.