


Figure 4. Dado blades installed in table saw.
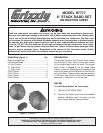
Figure 3. Chipper teeth offset from the outside
blade teeth.
6. Set the dado blades to the desired height,
make a test run in scrap wood, and then
measure the finished dado to make sure it is
the correct depth and width.
7. If the width is incorrect, repeat Steps 2–6,
adding or removing shims between the chip
-
per blades to reach the desired width.
DO NOT use the dado stack if the arbor nut
and arbor flange will not fully thread onto
the arbor. The arbor nut may come loose,
allowing the dado blades to fly out of the
table saw, causing serious injury or death.
Dado Insert
5. Secure the dado blades with the arbor nut and
flange, then install the dado insert as shown
in Figure 4. Use a narrower dado stack and
make multiple cuts if the arbor nut and flange
will not fully thread onto the arbor.
4. Install the chippers and the left outside blade
to reach the desired width.
— Make sure the teeth of the chippers align
with the gullets of the outside blades and
all of the teeth are offset (see
Figure 3).
— Use the shims and the
3
⁄32" chipper to make
odd sized dadoes; for example, a dado for
plywood.
— Measure the stack to check the width.
Never reach behind the dado or place hands
in the path of the dado while the saw is run
-
ning. If kickback occurs while reaching over
the blade, hands or arms will be pulled into
the spinning saw blade causing serious
injury.
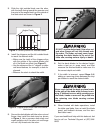
3. Slide the right outside blade over the arbor
with the teeth facing toward the operator and
the point of the angled teeth on the outside of
the dado stack as shown in
Figure 2.
Figure 2. Correct position for outside blades.
Angled Teeth
8. When finished with dado operations, install
the table saw blade, then re-install the blade
guard, anti-kickback devices, and the stan
-
dard table insert.
If you need additional help with this dado set, feel
free to call our Technical Support at (570) 546-
9663.