


-10-
H8103 Stirling Engine Kit 3
As you enjoy assembling your Model H8103, take
the opportunity to gain a better understanding of
how your Stirling engine works.
Here are some general tips to help make your
assembly process a successful experience:
• Establish a work area where the many small
parts can be conveniently organized and
stored.
• Make sure your hands and tools are clean
and oil free when handling the parts. Dirt and
grime will cause premature wear of the many
moving parts.
• Use an aerosol can of compressed air or a
clean brush to remove any debris you may
find on the parts. Make sure each part is
clean and dry before assembly.
• Take your time and be sure of the parts need
-
ed for each step—some of the parts appear
very similar.
• Do not overtighten the fasteners. Many of the
parts can be damaged by using excessive
force.
• A very small amount of silicon lubricant may
assist in assembling sliding parts.
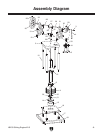
Use the parts lists and Assembly Diagram
beginning on Page
9, and the specific instructions
in the following subsections to assemble your
Stirling engine.
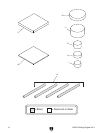
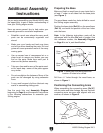
Preparing the Base
Make and finish a wood base to your taste that is
at least 1" wider on all sides than the base plate
(see Figure
1).
The wood base needs four holes drilled to mount
the Stirling engine assembly.
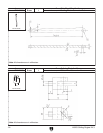
Position the base plate (Ref 16) on the wood base
(Ref 18), and mark the position of the four holes
onto the base
.
Note: In the following instructions, parts will be
referenced with the term Ref and a number. Use
this reference number, the Assembly Diagram
on Page
9 to aid in part identification.
Figure 1. Base plate and wood base with
location of holes to be drilled.
Drill four
7
⁄32" holes through the wood base, as
shown in Figure
1.
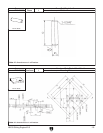
Positioning the Connecting Arms
When assembling the connecting arms (Ref 27)
with the axles and other linkage, be sure that both
connecting arms are even and aligned with one
another, as shown in Figure
2.
Figure 2. Connecting arms in correct alignment.
Additional Assembly
Instructions
Additional Assembly