


Operation Instructions
2. Temperature Setting
3. Clock Calibration
With the machine powered on (with no any digits flashing on the display), press or
button to enter temperature setting status with the temperature digits rapidly flashing.
Temperature can be changed between 35 - 75 with an increment 1 . In real-time
heating mode, you can directly press or button to adjust temperature setting value. In
medium warm status, machine defaulted highest temperature is 40 and can't be
adjusted. If actual water temperature is lower than setting value and the machine is in
medium warm mode, you need to change operation mode to real-time heating mode, and
then the machine can heat water to the set temperature.
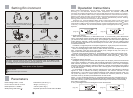
Clock goes in 24-hour and 60-min system in a second flashing way.
Example: calibrate the clock to 11:29
After powering on, in real-time heating and night power modes, you can press Set button
to enter clock calibration status with hour digits flashing. Press or button to set 11.
Press Set button again and minute digits flash. Press or button to set 29. You can
press Set button to confirm current setting, or wait 6 s after which the system will
automatically confirms and quits setting status (as shown in Fig. 7, machine is in real-time
heat / warm mode).
Fig.6
Fig.7
HEATING
ACTUAL
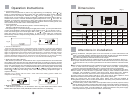
4. Power Level Selection
With the machine powered on, press Power button to directly go to power level selection
status. You can select a power level 850 W, 1300 W or 2150 W. If 850 W is selected, 850 W
digits are lighted and only the upper heating element works. If 1300 W is selected, 1300 W
digits are lighted and only the lower heating element works. If 2150 W is selected, 2150 W
digits are lighted and both the upper and lower heating elements work. In Delay mode,
machine defaulted heating power is 2150 W and can't be adjusted. Fig. 8 shows a heating
power level 2150 W, the present clock time 12:10, and the real-time heating mode.
5. Real-time Heat / Warm Setting
With machine powered on, as described in Item 10, press Mode button to enter Real-time
Heat / Warm mode with real-time heat indication lighted on. According to settings, machine
will automatically starts to heat or keep warm. The machine has a thermostat function, by
which, the machine goes into warm keeping status when it reaches the temperature setting
value. In warm keeping status, machine automatically starts heating when actual water
temperature is 5 (for setting value lower than 55 ) or 10 (for setting value equal to or
above 55 ) lower than the setting value, until reaching setting temperature again. It
repeats in this way.
HEATING
SET
HEATING
ACTUAL
Fig.8
Fig.9
Example: Fig. 9 shows real-time heat / warm status with heating power 1300W and
temperature setting 75 .
6. Medium Warm Setting
With machine powered on, as described in Item 10, press Mode button until it enters
Medium Warm operation mode (with Medium Warm indication on the display).
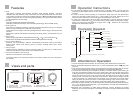
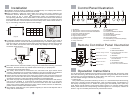
(Fig.1)
Remarks:the permitted error limit of above parameters is 10% (except the rated temperature).
Front View
Bottom View
I: Drain
A
B
d1
I
a1
b
1
C1
Dimensions
Attentions in installation
During installation, adequate space must be reserved for future maintenance and
repair. If the water heater is installed within decoration boards, the right board shall be
removable to facilitate removing the plastic cover during maintenance.
City water inlet pressure shall not be less than 0.05 Mpa.
Electric water heater shall be installed indoors with ambient temperature above 0 .
The pipes shall be collectively laid. Hot water outlet shall not be too far from use points.
In case farer than 8 m, hot water pipe shall have a thermal insulation to minimize heat
loss.
The mounting wall shall be firm and reliable to support twice the weight of water heater
full of water. Non-load bearing walls or air brick walls must have corresponding
protective measures like additional support, wall-through screws or back boards.
Electric water heater shall be located in a place easy for use, maintenance and with a
floor drainer. In case the tank or pipes leak, nearby or lower facilities shall not be
damaged. The installation location shall avoid being above toilet bowl, bathtub,
washbasin or doorframe, where will cause a suppressed or unsafe feeling to users.
Power socket for water heater shall be in a dry place free of water splash to avoid
nonnormal work of the water heater. (splash-proof box is preferred)
Do not confuse inlet and outlet water pipes. Safety valve shall be installed at
designated position with no random modification. The safety valve pressure relief vent
shall keep open to the air. Do not block it.
To ensure safety, water heater shall use a separate socket (not multi-purpose socket)
and be reliably grounded. Socket quality shall comply with local standard. Check with a
neo-electroscope the line and neutral are not wrongly connected. Only after confirming
the tank is full of water, no water leakage at various connections and power supply
meets requirements, power can be turned on to start heating.
80L
50L
60L
100L
d1
100mm
100mm
100mm
100mm
FCD-JTHMG50- E
FCD-JTHMG60- E
FCD-JTHMG80- E
FCD-JTHMG100- E
22kg
25kg
29kg
34kg
671mm
765mm
876mm
1052mm
442mm
442mm
479mm
479mm
410mm
410mm
450mm
450mm
Model
Net
Weight
a1
b1
c1
Volume
Rated
temperature
75
75
75
75