


SKU 37730 Page 6
NOTE: The actual torque delivered at each of the eight
settings will depend on the air pressure supplied to the
tool. We suggest that you test the actual torque by
tightening a nut or bolt at each setting, then observing
the resultant torque by using a mechanical torque
wrench (not supplied).
7. If installing a nut or bolt, set it as tight as possible by
hand before tightening with the Air Impact Wrench.
8. Place the socket (not included) over the fastener.
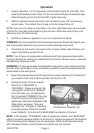
9. Grip the Air Impact Wrench tightly with both hands,
and rock the Throttle Lever “Butterfly” (5) to the
right. The tool will operate and tighten the fastener.
10. When the fastener is tightened, release the Throttle Lever “Butterfly” (5) , and
remove the tool from the fastener.
11. If possible, check the actual torque applied to the fastener with a mechanical
torque wrench (not supplied).
12. If removing a fastener, grip the Air Impact Wrench tightly with both hands, and
rock the Throttle Lever “Butterfly” (5) to the left. The tool will operate and
loosen the fastener (assuming that the fastener is a standard right-hand
thread). NOTE: Always check to be sure of the thread direction of any
fastener before attempting to install or remove it. If the fastener is a left-hand
thread, rock the Throttle Lever “Butterfly” (5) to the right for removal.
WARNING: If the fastener will not come off, first check to be sure of the
direction of the thread. If you have the thread direction correct and the fas-
tener will not come off, DO NOT INCREASE THE AIR PRESSURE to the tool
beyond 90 psi. This may damage the tool. You may have to use penetrating
oil, heat, or a mechanical wrench to remove the fastener.
13. When you are done using this tool, turn off the air compressor, and disconnect
the air hose. Put the Air Impact Wrench away in its proper storage place.
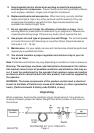
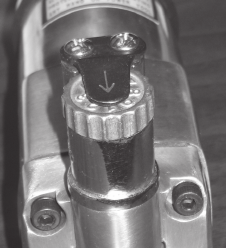
Regulator (38)
Maintenance
1. Your Air Impact Wrench should be kept clean and dry.
2. When not in use, store your tool in a suitable place where it will not be
exposed to water, corrosive materials, or undue banging around.
3. If you are not using an in-line oiler, you should inject a few drops of pneumatic
oil into the air inlet of the tool and the Oiler Screw (3) port after every hour of
continuous use.
4. If your tool loses power, or you notice air leaks, take it to a certified technician for service.
5. All repairs to this tool should be performed by a qualified service technician.