


Page 7For technical questions, please call 1-800-444-3353.SKU 38160
To Change/Install Sand Belts
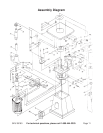
(See Parts Diagram and Parts List on pages 8 and 9)
Place switch in “OFF” position, and unplug the sander before performing any of the steps below.
The Oscillating Sander has been shipped completely assembled with a 2” sand belt (#49) and regular core board
installed. Change sand belts as follows:
TO REMOVE SAND BELT
1. Grasp and hold sand belt (#49) on rotating axle (#46). Loosen nut (#51). If nut is too tight and rotating axle
spins inside sand belt, secure the rotating axle with a wrench and loosen nut.
2. Remove nut, big washer (#50), and sand belt. Unscrew rotating axle clockwise and remove core board (#36) -
also see instructions below describing how to remove core board.
3. Remove big washer (#50) and clean sawdust accumulation.
TO INSTALL SAND BELT
1. Replace big washer (#50). Fin side of washer should always be installed down. The ns help push sawdust
through the dust exhaust port opening, preventing buildup of sawdust. Sawdust buildup in this area may cause
the oscillating motion to stop. The big washer must be used with all sanding sleeves.
2. Select and install the desired rotating axle.
3. Install appropriate sand belt on the rotating axle. (Note: If sanding sleeve becomes difcult to install or remove,
apply talcum powder on the inside of the sand belt before installing on axle).
4. Install big washer (#50) and nut.
5. Grasp and hold sand belt and tighten nut. Do not overtighten.
Replacing Core Boards
The Oscillating Sander comes with two core boards. The core board with the circular opening is for sanding when the working
table (#34) is level. The core board with the oblong opening is to be used when the working table is set at an angle.
To Remove Core Boards
Push rmly from underneath the working table until core board is removed.
To Insert Core Boards
1. Align the notch in the core board with the spring dowel (#35) located on the inner rim of the core board insert area.
2. Push down rmly until the core board is fully inserted and ush with the surface of the working table.