


Page 4
SKU 40131
Operation
Installation
Unpacking
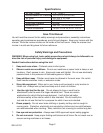
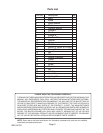
When unpacking, check to make sure the parts listed on page 5 are included. If any parts
are missing or broken, please call Harbor Freight Tools at the number on the cover of this
manual as soon as possible.
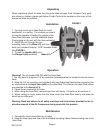
1. You may mount your Hose Reel on a wall,
workbench, or a ceiling. The surface you mount
to must be capable of holding the weight of the
Hose Reel, the hose, and the additional stress
from tugging on the unit with the hose extended.
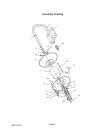
2. Mount the unit through the four
mounting holes on the Base (#1) with four
bolts (not included) fitted for 13/32” diameter holes.
Base (#1)
See FIGURE 1.
3. Thread the Handle (#23) onto
the Flange A (#6) assembly.
FIGURE 1
Warning!! Do not exceed 250 PSI with this Hose Reel.
1. You may need to prepare a 1/4” air connector (sold separately) to connect to the air source
hose.
2. Wrap the 1/4” air connector (not included) with pipe thread seal tape before connecting the
air source hose to the Input Valve (#24) on the Hose Reel. The Hose on the Hose Reel comes
pre-attached to the Swivel (#13).
3. Check the air connection for leaks.
4. When using the Hose Reel, remove hose from reel slowly. If it binds up, do not force it.
5. When reeling on hose, make sure the hose covers the Hose Reel evenly, and does not
bunch up on either end.
Warning: Read and adhere to all safety warnings and instructions provided in the in-
struction manual of the Air Compressor being used with this product.
1. Periodically check connection for air leaks.
2. Keep the hose clean and free of dirt and debris by wiping it down before winding it on to the
Hose Reel.
Maintenance