Page 7SKU 43430
Maintenance
The Air Spray Gun must be throughly cleaned immediately after use. If the paint drys inside
the Air Spray Gun, cleaning is much more difficult and it may no longer be possible to use it.
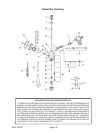
While doing this, refer to the Assembly Drawing on the last page.
Warning: Do this procedure in a well ventilated area, away from flames.
To clean the Air Spray Gun:
1. Remove the paint Plastic Cup (9) from the Air Spray Gun.
2. Remove Cup Cover (10) and pour any residual paint into the paint container and seal
it.
3. Pour thinner (nonflammable) into the Cup. Or, if water-based paint was used, add water.
Replace Lid.
4. Reattach the Plastic Cup to the Air Spray Gun and shake liquid inside Cup.
5. Turn on the Air Supply and spray the liquid on a piece of scrap material.
6. Repeat this procedure until the spray output is free of paint.
To Clean the Air Nozzle and Paint Needle
This procedure need only be done if the Air Spray Gun becomes clogged. To clean the
Nozzle (17) and Paint Needle (32):
1. Unscrew the Air Nozzle (17).
2. Remove the Fluid Nozzle (18).
3. Completely loosen (turn counterclockwise) the Fluid Control Knob (2).
4. Remove the Teflon Seal (20) and needle Spring (22).
5. Push out the Paint Needle (32).
Do not use any tools to do this. The needle could be damaged. If the needle does not
come out easily, loosen the Screw for Teflon Seal (20). The Needle Guide Hose can
remain inside.
Caution: Materials used when painting or cleaning may be harmful or fatal if inhaled or
swallowed. Use only in an area with adequate ventilation. Use a respirator or mask
when painting or using cleaning solvents. Do not use around flames.
6. Put all components in a container and clean using the Brush (14) and clean thinner or
water. The inside of the Air Spray Gun and Air Hose should also be cleaned.
Note: It is recommended to mount the Nozzle (17) first, then the Paint Needle (32).
7. Place a drop of grease on the Screw for Teflon Seal (20). Tighten screw in place. Verify
the needle moves freely.
8. When all components are clean and dry, reassembly components in the reverse order
(steps 7 through 1).