Page 5SKU 43471
For technical questions, please call 1-800-444-3353.
UNPACKING
When unpacking, check to make sure the parts listed on page 6 are included. If any
parts are missing or broken, please call Harbor Freight Tools at the number on the cover of
this manual as soon as possible.
REV 03e
ASSEMBLY
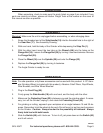
Warning! Make sure the unit is unplugged before assembling, or when changing discs.
Screw the threaded end of the Side Handle (18) into the threaded hole to the right of
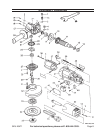
the Gear Box (17). See Assembly Drawing.
With one hand, hold the body of the Grinder while depressing the Stop Pin (1).
With the other hand, insert the two tabs on the Wrench (56) into the holes on the
Flange Nut (35). Loosen the Flange Nut (35) by turning it counterclockwise. Remove
the Flange Nut (35).
Place the Wheel (34) over the Spindle (30) and onto the Flange (33).
Replace the Flange Nut (35) by turning it clockwise.
The Angle Grinder is ready for use.
1.
2.
3.
4.
5.
6.
OPERATION
Note: For safe operation, only these accessories can be used with this product: 4-1/2” diam-
eter Grinding Wheel (included with this product), Abrasive Cutoff Discs, Flap Wheels,
Wire Brushes, and Wire Wheel Brushes.
Plug in the Cord Plug (55).
Firmly grasp the Side Handle (18) with one hand, and the body with the other.
Make sure the Protecting Cover (32) is between you and the grinding wheel. If neces-
sary, turn off the Grinder, unplug it, and rotate the Protecting Cover (32).
For grinding or cutting, approach your workpiece at an angle between 15 and 30 de-
grees. Remember to let the wheel do the work. Do not force it or put too much pressure
on the Grinder. Caution: Always be alert to the possibility of kickback. Always
firmly hold tool with both hands.
Slide the Switch (50) until it locks on. To turn it off, just press down on the Switch (50)
and it will unlock.
1.
2.
3.
4.
5.


