


Page 7SKU 45001
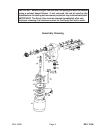
Problem 4 (Continued)
Cause: Loose or cracked Needle (#24).
Solution: Tighten or replace.
Cause: Fluid too heavy for suction feed.
Solution: Thin material
Cause: Dry or worn Packing (#10) or Bushings (#11,12).
Solution: Lubricate, replace, or tighten.
Problem 5: Will not spray.
Cause: Low air pressure at Spray Gun.
Solution: Check lines for kinks.
Cause: Closed Adjusting Screw (#28).
Solution: Open
Cause: Fluid too heavy for suction feed.
Solution: Thin material.
Problem 6: Dripping from tip.
Cause: Worn Needle (#24).
Solution: Replace (follow instructions in Maintenance section).
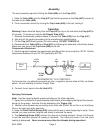
Maintenance
1. Periodically check the Gasket (#43) for wear (replace if necessary). Keep the air holes
clean.
2. Check for Needle (#24) wear (not uncommon). Look for tip wear and wear at the contact
point of the Needle (#24) and the Packing (#10). To replace Needle (#24), carefully remove
spring loaded Adjusting Screw (#28) by twisting and pulling the Needle Cap (#26) and the
Needle Lock Nut (#25). The Spring (#27) will pop out. Replace Needle (#24), and reas-
semble by reversing the directions above.
3. After each use, unscrew and remove Muffler (#16). Blow out with air or wash if necessary.
Reminder: Replacement parts available at Harbor Freight Tools.
Cleaning (Gun should be attached to compressor to complete the cleaning process)
Warning!! Do not use paint strippers on this unit as they will damage the aluminum. Never
allow the unit to lay on it’s side while coating is in the Cup (#47).
1. Be careful, as the Cup (#47) may still be pressurized. Loosen the Fluid Control
Screw (#36) to relieve pressure. Empty paint from Cup (#47) and add small amount of clean
solvent. Replace Lid (#42) and shake Cup (#47) vigorously. At the lowest possible pressure,
spray out the solvent into a waste bucket (make sure you are wearing respirator and eye
protection).
2. Empty Cup (#47) of remaining solvent and repeat the process until the Cup (#47) solvent
appears clean and free of the coating.
3. Disconnect air supply. Remove surplus solvent and wipe the Cup (#47) clean with a lint
free cloth.
Note: The Cup (#47) may be fully immersed in solvent for no more than 24 hrs. if needed.
Lubrication (before and after each use).
1. Using a non-silicon spray, lube the expose parts of the Needle (#24) surrounding the
Trigger (#8). Lube the Trigger Stud (#9) so it moves freely.
2. Remove Adjusting Screw (#28) and lubricate threads. Replace.
3. Unscrew Fluid Control Screw (#36) and lube Fluid Control Elbow (#32). Remove Air
Supply Tube (#48) and check and clean. Do the same for the No-Drip Elbow
Assembly (#45). Replace.