Page 8SKU 47840
For technical questions, please call 1-800-444-3353.
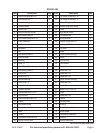
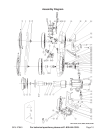
NOTE: Some parts are listed and shown for illustration purposes only and are not available
individually as replacement parts.
PLEASE READ THE FOLLOWING CAREFULLY
THE MANUFACTURER AND/OR DISTRIBUTOR HAS PROVIDED THE PARTS DIAGRAM IN THIS
MANUAL AS A REFERENCE TOOL ONLY. NEITHER THE MANUFACTURER NOR DISTRIBUTOR
MAKES ANY REPRESENTATION OR WARRANTY OF ANY KIND TO THE BUYER THAT HE OR SHE
IS QUALIFIED TO MAKE ANY REPAIRS TO THE PRODUCT OR THAT HE OR SHE IS QUALIFIED
TO REPLACE ANY PARTS OF THE PRODUCT. IN FACT, THE MANUFACTURER AND/OR
DISTRIBUTOR EXPRESSLY STATES THAT ALL REPAIRS AND PARTS REPLACEMENTS SHOULD
BE UNDERTAKEN BY CERTIFIED AND LICENSED TECHNICIANS AND NOT BY THE BUYER. THE
BUYER ASSUMES ALL RISK AND LIABILITY ARISING OUT OF HIS OR HER REPAIRS TO THE
ORIGINAL PRODUCT OR REPLACEMENT PARTS THERETO, OR ARISING OUT OF HIS OR HER
INSTALLATION OF REPLACEMENT PARTS THERETO.
Maintenance
When servicing, use only identical replacement parts from Harbor Freight Tools.
Failure to use identical replacement parts will void the warranty.
1. Always keep the motor housing clear of any debris.
2. Wipe the tool clean regularly with a clean cloth or dry brush. Never use solvents or harsh
cleaners.
3. Keep the saw blade clean by regularly removing any oil or debris.
4. Inspect the power cord before each use. If any damage exists, have it replaced by a quali-
fied technician.
5. If you see any sign of saw blade slippage, make sure blade tension is correct.
6. No motor lubrication is required. Under normal operating conditions, the bearings are
sufficiently lubricated for the life of the machine.
7. When not using the tool for long periods of time, remove the saw blade.
Cleaning or replacing the Carbon Brushes (4).
1. Unscrew the Brush Cap (5).
2. Carefully slide out the Carbon Brushes (4). Do not force or bend the spring attached to
the brushes.
3. Examine the springs for dirt or wear. To remove dirt, lightly rub with a common pencil eraser.
If the springs are very dirty, stretched, or worn at all, replace them with new ones.
4. When replacing the Carbon Brushes (4), slide them back in slowly, being careful not to
bend them or catch them on the side of the cylinder. Carefully screw on the Brush Cap
(5).


