


Page 6
SKU 47869
Operation (continued)
Usage.
Note: Always disconnect the Die Grinder from the air compressor hose before changing or
adjusting accessories.
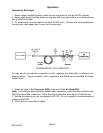
1. Use the two Wrenches (#30) to attach accessories. Place the Wrench (#30) on the notch
of the Clamping Nut (#25) to secure it. Use the other Wrench (#30) to turn the Collet (#24).
2. Insert the desired 1/8” mandrel into the Collet (#24) at least 5/8”.
3. Using the Wrenches (#30), tighten the Clamping Nut (#25).
Note: Before each use check the Collet (#24) and make sure the accessory is securely
fastened.
Note: Always wear ANSI approved impact safety goggles and a full face shield if you are
producing metal filings or wood chips. Wear an ANSI approved dust mask or respirator when
working around metal, wood, and chemical dusts and mists.
4. Make sure the workpiece is securely fastened down.
Warning! Make sure your hands or fingers are not in contact with the accessory before
starting the unit.
5. Turn on your compressor making sure it is not set above the recommended 90 PSI.
6. Hold the Die Grinder with both hands, away from your body, and twist on the Sliding
Knob (#4). Wait until the Die Grinder gets up to speed before contacting the workpiece.
Make gentle contact, allowing the Die Grinder to do the work without forcing it. If it isn’t
running smoothly, you are forcing it, which may burn out the Grinder.
7. When finished, twist off the Sliding Knob (#4) and disconnect from the compressor.
Maintenance
1. Before and after operation, add a few dops of Pnuematic Tool Oil to the airline connection.
Add a few drops more after each hour of continual use.
2. Never leave the unit connected to the compressor.
3. Wipe down or blow out with air occasionally. Never use solvents to clean the body of the
Die Grinder.
4. Check that the Collet (#24) is clear of dirt and debris.