


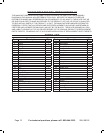

Page 9For technical questions, please call 1‑800‑444‑3353.SKU 68152
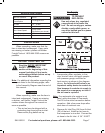
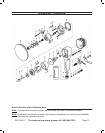
3. Turn the Spindle Lock so that it engages
with the Drive Spindle (51). This will
keep the Drive Spindle from freely
turning while installing the Backing Pad
(52).
4. Once the Drive Spindle is locked in
place, thread the Backing Pad into the
Drive Spindle.
5. Once the Backing Pad is securely
threaded onto the Drive Spindle, turn the
Spindle Lock back, allowing the Drive
Spindle to freely turn.
6. If the Spindle Lock is still engaged with
the Drive Spindle, the Sander will spin
rather than randomly orbit.
7. The Sander ONLY uses 6” diameter,
PSA (Pressure Senstive Adhesive)
sanding paper (not included).
8. Firmly attach the sanding paper to the
Backing Pad.
Work Piece and Work Area Set Up
1. Designate a work area that is clean and
well-lit. The work area must not allow
access by children or pets to prevent
injury and distraction.
2. Route the air hose along a safe path to
reach the work area without creating a
tripping hazard or exposing the air hose
to possible damage. The air hose must
be long enough to reach the work area
with enough extra length to allow free
movement while working.
3. Secure loose workpieces using a vise
or clamps (not included) to prevent
movement while working.
4. There must not be hazardous objects
(such as utility lines or foreign objects)
nearby that will present a hazard while
working.
General Operating Instructions
1. If an automatic oiler is not used, add a
few drops of Pneumatic Tool Oil to airline
connection before use. Add a few drops
more after each hour of continual use.
2. Always check the Sanding Pad for
possible wear. Do not use a worn, torn,
or defective pad.
3. Set the compressor to 90 PSI. Do not
exceed 90 PSI.
4. Connect the Air Line to the Tool as
explained in the Air Supply section.
5. Use the Air Regulator (16) to ne-tune
the Sander’s air pressure.
6. Grip the Handle (53) and depress the
Trigger (13). Allow the motor to reach
its full speed before sanding.
NOTE: If the Sander creates swirls when
it contacts the workpiece, disconnect
the air supply and verify that the Spindle
Lock is not engaging with the Drive
Spindle.
7. To begin sanding, apply the Sander to
the work surface. Maintain that angle
until nished sanding. WARNING! Do
not force the Pad or apply to much
pressure (a sign of this is the Pad
slowing down).
8. If tool requires more force to accomplish
the task, verify that tool receives
sufcient, unobstructed airow (CFM)
and increase air pressure (PSI).
CAUTION! TO PREVENT TOOL AND
ACCESSORY FAILURE, RESULTING
IN INJURY: Do not exceed the tool’s
maximum air pressure rating. If the
tool still does not have sufcient force at
maximum pressure and sufcient airow,
then a larger tool may be required.