


Page 5
SKU 90115
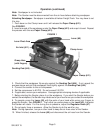
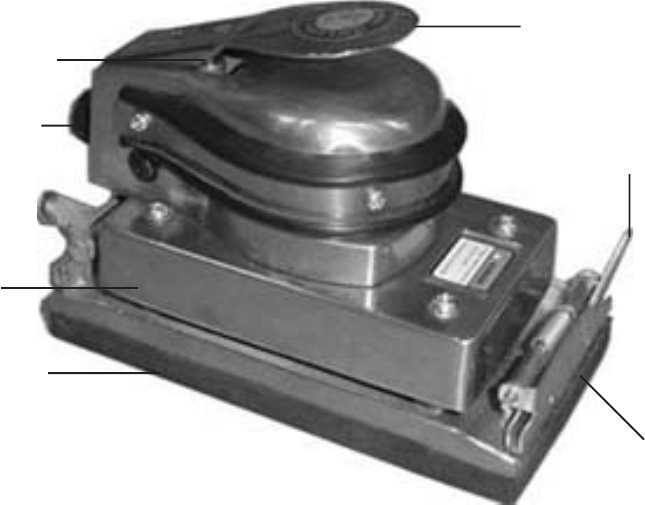
Operation (continued)
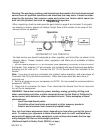
Paper Clamp (#41)
Clamp Lever
Sanding Pad (#44)
Air Inlet (#11)
FIGURE 1
Lever (#5)
Attaching Sandpaper. Sandpaper is available at Harbor Freight Tools. You may have to cut
it to size
1. Push down on the Clamp Lever and it will release the Paper Clamp (#41).
See FIGURE 1.
2. Insert one end of the sandpaper under the Paper Clamp (#41) and snap it closed. Repeat
the process with the rear Paper Clamp (#41).
3. Check that the sandpaper fits snugly against the Sanding Pad (#44). If not, repeat the
process above and pull the sandpaper more tightly against the Sanding Pad (#44).
4. Connect the sander to the air compressor.
5. Set the compressor to 90 PSI. Do not exceed 100 PSI.
6. If applicable, secure your workpiece. Use appropriate clamping devices if applicable.
7. Before starting the Sander, place it on the workpiece. If you start the Sander before you
contact the workpiece, the Sander may vibrate out of your hand once you contact the workpiece.
8. To operate, press the Lever (#5) with the palm of your hand while using your fingers to
grasp the Sander. See FIGURE 1. The further you press down on the Lever (#5), the faster
the Sander will rotate. For fine tuning the air pressure, adjust the Regulator Knob (#7).
9. Do not apply force or pressure. Allow the Sander to do the work for you.
Note: During operation, use your other hand to keep the air hose clear of the Sander.
10. When finished, release the Lever (#5) and disconnect the air hose from the Sander.
Grasp Here
(with fingers)
Note: The Sander must be disconnected from the air hose before attaching sandpaper.
Lever Pivot Area
Note: Sandpaper is not included.