


Page 6SKU 92427 For technical questions, please call 1-800-444-3353
Operation (continued)
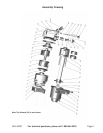
Refer to FIGURES 2 and 4, and the Assembly Drawing on page 9.
Note: Turn off your air compressor and disconnect the air hose when you are changing
sockets. After you attach the socket, attach the air hose and turn the air compressor
on.
1. Select the appropriate size 1” drive socket for your needs.
2. Push and snap the socket (not included) onto the Anvil (43).
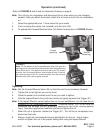
3. To operate the Forward/Reverse Valve (34) follow the directions in FIGURE 5 below.
Tightening
Note: Set the Forward/Reverse Valve (34) so that the anvil turns clockwise (forward).
4. Tighten the nut as tight as you can by hand.
5. Place the socket (not included) over the nut you wish to tighten.
6. Grip the Impact Wrench firmly with two hands and gently squeeze the Trigger (21).
Note:
If the Impact Wrench cannot tighten the nut to your satisfaction, do not raise the air
pressure on the compressor over 120 PSI. Pressures above 120 PSI will strip the
workpiece and damage the tool, potentially causing the tool to fail, causing serious
injury. Use other appropriate methods and tools to tighten the nut.
7. When the nut is tightened, release the Trigger (21). Turn off the air compressor and
disconnect the hose.
8. Always check the recommended torque specification for the nut. Use a torque
wrench to tighten the nut to the proper setting after using the Impact Wrench.
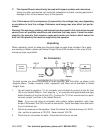
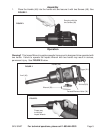
FIGURE 4
Reverse
(loosening)
Forward
(tightening)
Note: On the bottom of the Forward/Reverse Valve (34) there are
markings on the valve that show what direction the Forward/Reverse
Valve (34) is set to. If the bottom valve is turned in the “Off” arrow’s
direction, then the Impact Wrench is set to take off bolts. If the bot-
tom valve is turned in the “On” arrow’s direction, then the Forward/
Reverse Valve (34) is set to tighten on bolts.
FIGURE 5
ON
OFF
Oil Screw
(22)
REV 11/04