


SKU 93100 For technical questions please call 1-800-444-3353. Page 5
Operation
1. Install a standard 1/4” Air Connector (not included) to the Air Inlet (36). First wrap
the threaded portion of the 1/4” air connector with pipe thread seal tape before
threading it into the Air Inlet (36). Tighten securely.
2. Attach a standard quick connector (not included) to your 3/8” air pressure source
hose. Then attach the air hose to the Air Impact Wrench.
NOTE: If you are not using an automatic in-line oiler, add a few drops of pneumatic oil
to the Air Inlet (36) before attaching the air hose. Add a few more drops of oil after
every hour of continual use.
3. Set the air pressure regulator on your air compressor at 90 psi.
WARNING: Do not exceed the recommended pressure of 90 psi. Damage to your
tool, and possible personal injury and/or property damage may result.
4. Check the air line and its connections for air leaks. Make note of these, and
repair them before using this tool.
NOTE: Turn off your air compressor and disconnect the air pressure hose before
changing sockets or making any adjustments to this tool. Severe injury or property
damage may otherwise result.
WARNING: This tool generates considerable torque when in use. Always hold the tool
with both hands when using, and brace yourself to resist the torque which will be
delivered to the work piece.
5. Select the appropriate size 3/8” square drive impact socket (not included) for
your needs. Push and snap the socket onto the Anvil (9).
Note: Impact Sockets must be rated for 10,000 RPM or greater.
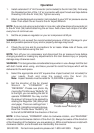
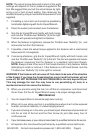
6. Set the direction of the Air Impact
Wrench to “FORWARD” or
“REVERSE”. Please see photo. By
moving the Throttle Lever “Butterfly” (5)
to the right, you are setting the tool to
operate FORWARD. You may control
the amount of torque to be applied by
rotating the Regulator (38)
(See photo
next page).
There are settings from 1
through 8, indicating increasing torque.
Rock the Throttle Lever “Butterfly” (5)
to the left to REVERSE the direction of the tool.
NOTE: In this manual, “FORWARD” refers to clockwise rotation, and “REVERSE”
refers to counterclockwise rotation of the Anvil (9). Always be aware of the direction
of the threading of the fastener you are working on. While most fasteners install with
clockwise rotation, some threads are intentionally the reverse.
FORWARDREVERSE
Throttle Lever “Butterfly” (5)