


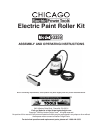

SKU 93359
For technical questions, please call 1-800-444-3353
Page 8
Cleaning
Purging the Paint Roller
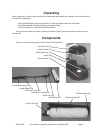
1. When you have completed painting, it is important to clean the Electric Paint Roller Kit. First remove
the Suction Tube (14) from the Paint Can (12) and place it into a can of paint cleaning solution, such
as water. NOTE: The cleaning solution will depend on the type of paint being used. See specific
cleaning instructions on page 9.
2. Remove the Spatter Shield (46) by pulling it off the Paint Roller assembly. Remove the Paint Roller
(43) and Roller Spindle (44) from the Roller Arm (39). To do this, press down the lever on the Locking
Tab (38), then pull the Paint Roller Assembly off the Roller Arm.
3. Further disassemble the Roller Assembly by placing your thumb into the opening in the Roller
Bushing (42), and pry it out of the Paint Roller (43). Place the Paint Roller components into a bucket
or sink prior to being washed.
4. Remove the Paint Can Lid (13) and place it in the bucket for cleaning.
5. Hold the Roller Arm (39) over the open Paint Can (12). With the Selector Switch turned to the “Paint”
setting, press the Handle Button (24) to pump paint remaining in the tool back into the Paint Can.
Stop pumping by releasing the Handle Button (24) when the paint has been pumped through and
cleaning fluid starts to come out of the Roller Arm (39).
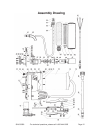
Assembly and Operation
1. Be sure your paint is properly stirred or mixed before use. Unstirred paint pigments at the bottom of
the Paint Can WILL clog this tool. Remove the lid from a 1 gallon standard paint can. Press the Paint
Can Lid (13) from this kit securely on the top of the paint can.
2. Place the lidded paint can on the Motor Base (01). Tighten the Tension Band (10) around the can
using the Latch (06).
3. Insert the Suction Tube (14) through the Paint Can Lid (13) and to the bottom of the Paint Can (12).
4. If you want to use the Extension Tube (34), insert the Roller Arm Connector (40) into the Roller Arm
Coupling (35). Then press the Extension Connector
(33) into the Handle Connector (27).
5. If you do not want to use the Extension, simply press
the Roller Arm Connector (40) directly into the Handle
Connector (27).
6. Attach the Spatter Shield (46) over the Roller (43) by
pressing it in place onto the Locking Tab (38) and the
Roller Bushing (42).
7. Observing workplace safety warnings, plug in the
Power Cord (16) to an appropriate power source.
Move the Selector Switch (02) to the “Paint” position.
8. Press the Handle Button (24), the Pump Assembly
(15) will begin to operate, causing paint to flow
through the handle into the Paint Roller (43).
9. Apply the paint to the work surface, by rolling it on. Press the Handle Button (24) periodically as
needed to reload the paint in the Paint Roller (43).
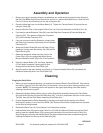
Selector Switch (02)
REV 02/07