


SKU 93874 For technical questions, please call 1-800-444-3353. Page 11
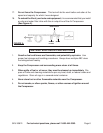
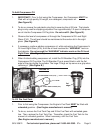
QUICK
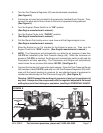
COUPLER
(NOT INCLUDED)
TOOL PRESSURE
REGULATOR
(29)
TOOL PRESSURE
GAUGE
(55)
TANK PRESSURE
GAUGE
(46)
FIGURE E
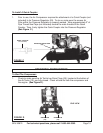
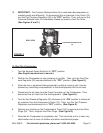
TOOL
PRESSURE
REGULATOR
(29
2. Turn the Tool Pressure Regulator (29) counterclockwise completely.
(See Figure E.)
3. Connect an air hose (not included) to the previously installed Quick Coupler. Then,
connect the other end of the air hose to the tool or equipment being powered.
(See Figure E.)
4. Turn the Engine’s Power Switch to its “ON” position.
(See Engine manufacturer’s manual.)
5. Turn the Engine Choke to its “CHOKE” position.
(See Engine manufacturer’s manual.)
6. Pull the Starter Grip briskly one or more times until the Engine begins to run.
(See Engine manufacturer’s manual.)
7. Allow the Engine to run 3-5 minutes for the Engine to warm up. Then, turn the
Engine Choke to its “RUN” position. (See Engine manufacturer’s manual.)
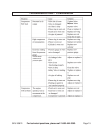
8. NOTE: The Compressor will automatically run while the air pressure is less than
145 PSI as indicated by the Tank Pressure Gauge (46). When the maximum air
pressure (145 PSI) is reached, the Engine will automatically switch to idle and the
Compressor will stop operating. The Compressor and Engine will automatically
restart when the air pressure falls below 105 PSI. (See Figure E.)
9. Connect the tool and air hose to the quick coupler. Once the Tank Pressure Gauge
(46) reaches
at least
105 PSI, gradually turn the Tool Pressure Regulator (29) clock-
wise until the lowest working air pressure for any attached piece of equipment is
reached as indicated by the Tool Pressure Gauge (55). (See Figure E.)
Warning: NEVER exceed the working air pressure of any tool or equipment at
any time. Always start the compressor with the regulator adjusted to its lowest
setting to prevent tool damage or explosion, resulting in PERSONAL INJURY.