


SKU 94029 For technical questions, please call 1-800-444-3353. Page 13
5. CAUTION! All maintenance, service, or repairs not listed in this manual
are only to be attempted by a qualified service technician.
PLEASE READ THE FOLLOWING CAREFULLY
THE MANUFACTURER AND/OR DISTRIBUTOR HAS PROVIDED THE PARTS LIST AND ASSEMBLY
DIAGRAM IN THIS MANUAL AS A REFERENCE TOOL ONLY. NEITHER THE MANUFACTURER OR
DISTRIBUTOR MAKES ANY REPRESENTATION OR WARRANTY OF ANY KIND TO THE BUYER
THAT HE OR SHE IS QUALIFIED TO MAKE ANY REPAIRS TO THE PRODUCT, OR THAT HE OR SHE
IS QUALIFIED TO REPLACE ANY PARTS OF THE PRODUCT. IN FACT, THE MANUFACTURER AND/
OR DISTRIBUTOR EXPRESSLY STATES THAT ALL REPAIRS AND PARTS REPLACEMENTS SHOULD
BE UNDERTAKEN BY CERTIFIED AND LICENSED TECHNICIANS, AND NOT BY THE BUYER. THE
BUYER ASSUMES ALL RISK AND LIABILITY ARISING OUT OF HIS OR HER REPAIRS TO THE
ORIGINAL PRODUCT OR REPLACEMENT PARTS THERETO, OR ARISING OUT OF HIS OR HER
INSTALLATION OF REPLACEMENT PARTS THERETO.
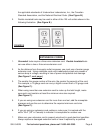
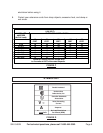
PARTS LIST
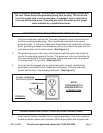
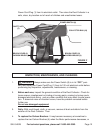
Covers. NOTE: New Carbon Brushes tend to arc or spark when first used
until
they wear and conform to the Motor’s Armature.
(See Figure F,
previous page.)
Part
#
Description Qty
.
Part
#
Description Qty
.
1 Power Cord 1 23 Collector Bag 1
2 Cord Clamp 1 24 Clamp 1
3 Brush Cover 2 25 Inlet Cover 1
4 Carbon Brush 2 26 Safety Screen 1
5 Washer 1 27 Collector Body 1
6 Screw 1 28 Screw 9
7 Safety Key 1 29 Lock Washer 9
8 Power Switch 1 30 Hex Bolt 4
9 Screw 2 31 Lock Washer 4
10 Flat Washer 2 32 Machine Mounting Bracket 1
11 Switch Cover Plate 1 33 Hex Nut 4
12 Motor Mounting Bracket 1 34 Flat Washer 8
13 Shaft Key 1 35 Handle 1
14 Ground Conductor Cover 1 36 Cap Nut 4
15 Hex Screw 4 37 Lock Washer 8
16 Lock Washer 4 38 Hex Nut 4
17 Gasket 1 39 Caster 4
18 Collector Cover 1 40 End Cap 1
19 Gasket 1 41 Machine Base 1
20 Impeller 1
21 Washer 1
22 Hex Nut 1
the Motor Housing. To do so, remove the two Brush Covers (3). Then, remove
the two Carbon Brushes. If the Carbon Brushes are worn down more than 1/2,
replace
both
Carbon Brushes. If, however, the Carbon Brushes are just dirty
they may be cleaned by rubbing them with a pencil eraser. When installing the
Carbon Brushes, make sure the carbon portion of the Carbon Brushes contact
the Motor Armature, and that the springs face away from the Motor. Also, make
sure the springs operate freely. After cleaning or replacement, replace the Brush
stops working completely. The Carbon Brushes are located on each side of