


SKU 94748 For technical questions, please call 1-800-444-3353 PAGE 11
OPERATING INSTRUCTIONS
CAUTION! Always use safety equipment. Wear ANSI-approved safety impact
eye goggles and heavy duty work gloves when operating the Belt Sander. Also, a
dust mask and hearing protection must be used for appropriate conditions.
CAUTION! Always secure the workpiece in place, using a vise or clamps (not
included).
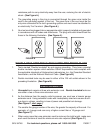
Make sure the Power Switch (27) is in its “OFF” position. Then, plug the Power
Cord/Plug (15) into the nearest 120 volt, grounded, electrical outlet.
(See Figure E.)
Keep the Belt Sander off the work surface. Then, squeeze the Power Switch (27)
to start the tool. If desired, use the Lock Button (14) to lock the Power Switch in its
continuous run mode. (See Figure E.)
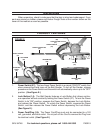
Place the heel of the Belt Sander on the work surface first. Then with a forward
motion, begin sanding as the tool is lowered onto the work surface.
Move the Belt Sander slowly back and forth across the work surface, using short,
overlapping strokes.
Do not apply excessive pressure on the Belt Sander. Too much pressure will over-
load the motor and reduce Sanding Belt (66) speed. Avoid tilting or rocking the Belt
Sander or sanding in one spot for too long.
Begin sanding with a coarser grit Sandpaper and gradually use finer grits until the
desired finish on the work surface is achieved.
When finished sanding, lift the Belt Sander off the work surface. Squeeze the Power
Switch (27) to disengage the Lock Button (14) and turn off the Sander.
Allow the Belt Sander to come to a complete stop before setting the tool down.
Unplug the Power Cord/Plug (15) from its electrical outlet.
Make sure to store the Belt Sander in a clean, dry, safe location out of reach of
children and other unauthorized people.
1.
2.
3.
4.
5.
6.
7.
8.
9.
10.