


SKU 98480 For technical questions please call 1-800-444-3353. Page 5
Operating the Radio Transmitter
1. The Transmitter uses 8 “AA” batteries (not included). Remove the Battery Compartment
Cover (12)-see Figure 4. Insert the batteries into the Battery Compartment making certain to
line up the batteries with the polarity indicated in the Battery Compartment. Press the
Battery Compartment Cover (12) back into place.
2. The Radio Transmitter (2) transmits a signal to the airplane’s receiver.
3. The Radio Transmitter (2) has a LED display that will light up when the Transmitter is on.
The LED readout will indicate the strength of the battery charge:
Green indicates the batteries are at full capacity
Yellow indicates the batteries are at half capacity
Red indicates the batteries need replacing.
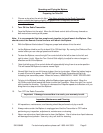
4. The Radio Transmitter/Charger is turned ON and OFF with the On/Off Switch located
midway between the Control Sticks-see Figure 4.
5. The Radio Transmitter/Charger has two Control Sticks.
The Control Stick located on the left moves vertically and controls the Climb. Push
the Climb Control Stick forward to turn on the twin motors and cause the Biplane to climb.
Pull back on the Climb Control Stick to slow down the twin motors and cause the Biplane to
lower altitude-see Figure 4.
The Control Stick located on the right moves horizontally and controls the direction of the
Biplane. Pushing the Turn Control Stick right or left causes the Biplane to turn right or left.
6. Attach the Wind Ribbon to the Radio Transmitter Antenna.
Installing Propellers
1. Make certain Radio Transmitter is OFF and that the Battery Pack is unplugged.
2. The Biplane comes with spare Propellers. If necessary, remove the Nut holding each
Propeller in place. Remove the Propeller. Install new Propeller.
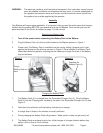
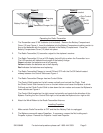
Transmitter/Charger Unit (2)
Battery Pack (4)
Figure 3
Charging
Jack
LED readout
On/Off
Switch
Climb
Control
Stick
Turn Control
Stick
Figure 4