


SKU 94855 PAGE 11
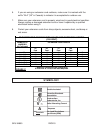
3. Forward/Reverse Button: The Forward/Reverse Button allows you to change the
rotational direction of the Impact Wrench. For a clockwise rotation, move the
Forward/Reverse Button to the
right
. For a counterclockwise rotation, move the
Forward/Reverse Button to the
left
. To avoid damage to the Impact Wrench,
always wait until the tool completely stops before changing rotational directions.
(See Figure D.)
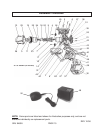
4.
1/2” Drive Impact Head: The 1/2” Impact Head features a spring and ball clip to
securely hold a socket. The Impact Head accepts all sizes of standard and
metric sockets having a 1/2” drive.
5.
Battery (30): The power source for the Impact Wrench is a re-chargeable, 18 VDC
Battery. Make sure to follow all safety precautions when working with the Battery.
TO CHARGE THE IMPACT WRENCH
1. NOTE: The Battery (30) requires charging. The first charge requires 5 hours charge
time prior to using the Impact Wrench.
2. The Battery (30) should only be recharged when the Impact Wrench begins to run
slowly.
3. When the Battery (30) requires recharging, a 3 to 5 hour charge allows the tool to
operate at full power. Do not recharge the Battery longer than 5 hours, as damage
to the Battery and/or Impact Wrench will occur.
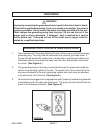
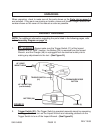
4. Remove the Battery (30) from the Impact Wrench. Slide the Charging Base (50)
onto the top of the Battery (30) (see Figure 1, page 12) and plug the Charger (48)
into the Charging Base (see Figure 2, page 12). Then plug the Charger (48) into
the nearest 120 Volt, grounded electrical outlet.
5. The red light on the Charger Base (50) indicates that the Battery (30) is charging. It
will stay lit while the Battery (30) is charging. The Charging Base automatically stop
charging the Battery (30) when the battery gets too hot (over 113 degrees
Fahrenheit). It will automaticity resume charging of the Battery (30) when the
temperature falls below 113 degrees Fahrenheit.
6. The green light on the Charger Base (50) indicates that the Charging Base is getting
power.
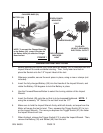
7. Once the Battery (30) is fully charged, disconnect the Charger (48) from the electrical
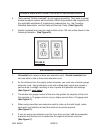
outlet. Next disconnect the Charger Base (50) from the Battery (30). Press in the
tabs on the Battery (30) while sliding out the Charger Base (50) (see Figure 1, on
the next page).