


Page 9SKU 95020
For technical questions, please call 1-800-444-3353.
ASSEMBLY INSTRUCTIONS
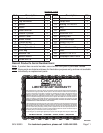
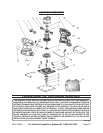
Note: For additional information regarding the parts listed in the following pages, refer to
the Assembly Diagram on page 12.
CAUTION: Always make sure the Power Cord (26) of the Sander is unplugged from its
electrical outlet prior to making any adjustments or assembling to the tool.
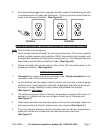
ATTACHING THE DUST BAG (12)
To attach the Dust Bag (12) to the Palm Sander, place the opening of the Dust Bag
(12) on top of the opening of the Dust Port of the Palm Sander and press down.
Snap it in place into the rectangular shaft at the back of the Sander.
The Dust Collection Chute will only work if the sandpaper has holes that line up
with the 6 dust collection holes in the Backing Pad (22). (There are 4 other holes in
the Backing Pad for the Screws).
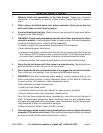
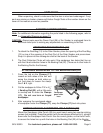
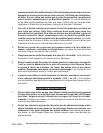
ATTACHING SANDPAPER TO THE BACKING PAD (22)
Press the tab on the Clamps (17)
inward on both sides of the unit and
swing the clamps on both sides up,
out, and down to loosen the clamp.
See 1 & 2, right.
Cut the sandpaper to fit the 4” W x 4
1
/
2
”
L Sanding Pad (22), with a little extra
to overlap and fit under the Clamps
(17). Do not use torn or frayed
sandpaper.
After wrapping the overlapped edges
of sandpaper under the Clamps (17), snap the Clamps (17) back into place.
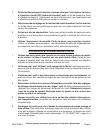
HOW TO USE THE SANDPAPER HOLE PUNCH (29)
Mount the Sandpaper Hole Punch (29) to a work bench using two counter sinking
screws (not included). Press the sander (with the sandpaper attached to it), straight
down onto the Sandpaper Hole Punch. Use the corner guides, on the Hole Punch,
to assure the holes line up with the holes in the Backing Pad (22) of the Sander.
1.
2.
1.
2.
3.
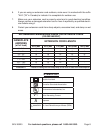
UNPACKING
When unpacking, check to make sure that the item is intact and undamaged. If any
parts are missing or broken, please call Harbor Freight Tools at the number shown on the
cover of this manual as soon as possible.
Sandpaper
goes under
here
REV 02/07