


Page 4SKU 95388
For technical questions, please call 1-800-444-3353.
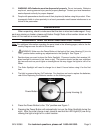
Note: During the day, the Solar Panel converts sunlight into electricity, recharging the
batteries. The amount of light the Solar Panel receives depends on placement of
the Solar Spotlight, geographic location and weather. If the weather is cloudy and
the panel did not receive a full charge, the Solar Spotlight may not achieve the full
hours of operating time. It will catch up on its own after two to three days of full
sun.
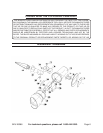
Inserting the Ground Stake (11):
1. Insert the Connecting Shaft Screw (7) into the hole on the Connecting Shaft (6).
Slide the Connecting Shaft 2 (9) onto the Shaft Screw (7) so that Connecting Shaft
(6) and Connecting Shaft 2 (9) are fitted together. Thread on Nut (10) to secure in
place.
2. Insert Ground Stake (11) up into the Connecting Shaft 2 (9).
3. Warning: Before inserting the Solar Spotlight into the ground, make certain to
choose an area where there are no underground pipes, cables or other obstructions.
Make certain that the ground is soft enough to accept the Ground Stake (11). Gently
insert the Ground Stake (11) into the ground making certain that it is in solid. Make
certain that the Stake is completely inserted into the ground to assure full stability
for the Solar Spotlight.
4. The Lamp Housing (5) rotates up and down to obtain the best lighting situation.
The Solar Panel (1) pivots on a ball and can be set to a number of different angles
to obtain the best angle for solar power.
REPLACING THE BATTERIES
It is recommended that you replace the batteries every 12 months. Before perform-
ing any maintenance on the Spotlight, make certain that the Power Button is in the
OFF position.
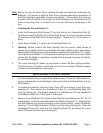
2. To access the batteries, twist the Lamp Cover (22) and remove it from the Lamp
Housing (5). Then remove the Transparent Cover (21) and Reflecting Bowl (20)
from the Housing (5). The Battery Housing (17) and Batteries (16) are attached to
the Reflecting Bowl (20). See Figure 2, next page.
3. Remove the old Batteries (16). Make certain that the new batteries are “AA” , Ni-Cd
rechargeable. Install the new batteries into the Battery Housing (17). Make certain
that the batteries are placed according to the correct polarity. Insert the Battery
Housing (17) and Reflecting Bowl (20) back into the Lamp Housing (5). Place the
Transparent Cover (21) back over the Reflecting Bowl (20) and screw the Lamp
Cover (22) back over the Lamp Housing (5).
1.