


SKU 98524 For technical questions, please call 1-800-444-3353. Page 13
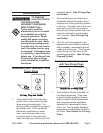
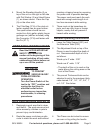
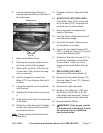
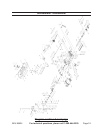
Use the included Hex Wrench to 6.
remove both Hex Bolts on the back of
the blade case.
Hex Bolts
(19, 21)
Blade Cover
7. Remove the Blade Cover.
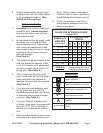
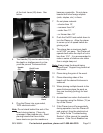
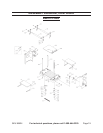
Wearing work gloves, rotate the cut-8.
ter head until the latch engages.
Remove the six bolts (172) from the 9.
Cutter Head (168) and use the mag-
nets to remove it.
Use the magnets to remove the 10.
Blade (171) from the pins that hold it
in place.
Using the magnets, put a new blade 11.
onto the pins.
Replace the Cutter Head and secure 12.
it.
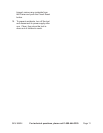
Push down on the latch to release the 13.
cutter head.
Rotate the cutter head until it latches 14.
in place and replace the other blade
as instructed above.
Note: Always replace both blades at the
same time.
Replace the cover. Secure all hard-15.
ware.
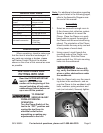
ADJUST ROLLER CASE LEVEL. 16.
If the Roller Case (151) is not paral-
lel to the base (212), the planer will
produce cuts of uneven depth.
Use a test piece to measure the 17.
height of the taper.
Turn the Planer off and disconnect it 18.
from the power supply.
Fold both Extension Tables up and 19.
lay the planer on its back.
Loosen the two Head Screws (226, 20.
232). Loosen the Chain (231) by slid-
ing the Idler Bracket (224).
Rotate the Elevation Screws (211) to 21.
correct the orientation of the Roller
Case to Base. Each turn of the
screw will move the Roller Case by
1/16”.
REPLACING THE V-BELT. 22.
Remove the Elevating Handle (4).
Remove the four Head Screws (15) 23.
from the Upper Cover (10). Remove
the Upper Cover.
Remove the right side cover.24.
Remove the V-Belts (61, 186) from 25.
the Pulleys (188 & 189, 60 & 184)
and replace with new belts. Always
change both belts at the same time.
Reassemble the Planer.26.
27. WARNING! If the supply cord of
this power tool is damaged, it must
be replaced only by a qualied
service technician.