


Page 9For technical questions, please call 1-800-444-3353.Item 98622
SAFETYOPERATIONMAINTENANCE SETUP
Operating Instructions
Read the ENTIRE IMPORTANT SAFETY INFORMATION section at the beginning of this
manual including all text under subheadings therein before set up or use of this product.
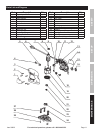
Note: For additional information regarding the parts listed in the following pages,
refer to Parts List and Diagram on page 11.
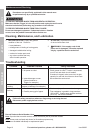
Tool Set Up
TO PREVENT SERIOUS INJURY FROM ACCIDENTAL OPERATION:
Make sure that the Trigger is in the off-position and unplug the tool from its
electrical outlet before performing any procedure in this section.
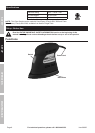
1. Before installing sandpaper, make sure the
Base Plate (26) is free of dust and dirt and
that the Palm Mouse Sander is unplugged and
the Switch (15) is in the “OFF” position.
2. The Base Plate (26) will hold any hook and
loop sandpaper without clamps or glue.
Simply line up the sandpaper with the
Base Plate (26) and press together.
3. To remove used sandpaper, peel one edge away
from the Base Plate (26) until the whole sheet is free.
CAUTION: Do not use torn or severely worn
or damaged sandpaper. To do so could
damage the surface of the Base Plate (26).
Workpiece and Work Area Set Up
1. Designate a work area that is clean and well-lit.
The work area must not allow access by children
or pets to prevent distraction and injury.
2. Route the power cord along a safe route to reach
the work area without creating a tripping hazard or
exposing the power cord to possible damage. The
power cord must reach the work area with enough
extra length to allow free movement while working.
3. Secure loose workpieces using a vise or clamps
(not included) to prevent movement while working.
4. There must not be objects, such as utility lines,
nearby that will present a hazard while working.
General Operating Instructions
1. Make sure that the Trigger is in the
off-position, then plug in the tool.
2. Turn the Switch (15) ON.
3. Do not use excess pressure while sanding
and always sand in same direction as grain of
wood. Let the sandpaper do the work. Apply
even pressure over entire workpiece.
4. Check the wear on the sandpaper at regular
intervals and replace as necessary. NOTE:
Always turn OFF Switch (15) and unplug the
Sander before changing sheets of sandpaper.
5. When sanding is competed, remove the Palm Sander
from the workpiece and turn off the Switch (15).
6. When completely finished using the Palm
Sander, use vacuum to dislodge all sand
shavings and dust, wipe with clean, soft cloth.
7. To prevent accidents, turn off the tool and
unplug it after use. Clean, then store the
tool indoors out of children’s reach.