


SKU 45813 PAGE 11
10. After the wax has been applied to the vehicle’s surface, turn the Power Switch
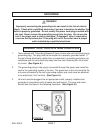
(part #13) to its “OFF” position. Then unplug the Power Cord (part #14) from the
electrical extension cord, and unplug the extension cord from the grounded, 120
volt, electrical outlet. (See Figure D.)
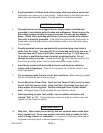
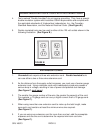
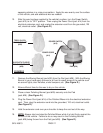
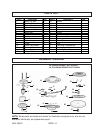
TERRY CLOTH
WAXING BONNET
(#28)
SYNTHETIC FLEECE
POLISHING BONNET
(#29)
FIGURE D
sweeping strokes in a criss-cross pattern
. Apply the wax evenly over the surface
of the vehicle, and add additional wax as needed.
11. Remove the Waxing Bonnet (part #28) from the Pad (part #26). With the Waxing
Bonnet in your hand apply the wax to all hard to reach areas of the vehicle such
as around lights, door handles, under bumpers, etc. (See Figure D.)
12. Allow sufficient time for the wax to dry on the vehicle.
13. Place a clean Polishing Bonnet (part #29) securely onto the Pad
(part #26). (See Figure D.)
14. Plug the Power Cord (part #14) of the Polisher/Waxer into the electrical extension
cord. Then, plug the extension cord into the grounded, 120 volt, electrical outlet.
(See Figure D.)
15. Hold the extension cord over your shoulder to keep the cord out of the way
.
16. NOTE: Always start and stop the Polisher/Waxer while it is held firmly against the
surface of the vehicle. Failure to do so may result in the Polishing Bonnet
(part #29) being thrown from the Pad (part #26). (See Figure D.)
PAD (#26)
POWER CORD
(#14)
POWER SWITCH
(#13)