


SKU 90979 For technical questions, please call 1-800-444-3353. Page 5
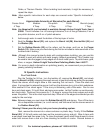
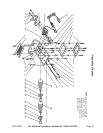
Figure A
conditions around the tumbler are unchanged, and that the tumbler
continues to operate in a safe location.
II. Before Use
1. Before the first use, and once a month following, put a few drops of oil on the Shaft
Sleeve (14) bearings.
2. Check the Belt (37) tension. It must be kept as loose as possible without allowing it to
slip on the Driving Pulley (35). Check before each use.
3. Make sure the exteriors of the Rubber Barrels (22) are clean so that they don’t slip on
the rollers. Wipe them with a soapy cloth, then wipe them clean with a damp cloth, and
dry them thoroughly. Do not use liquid cleaners or solvents.
4. Make sure that the Stops (6) are lightly touching
both Barrel Lids (28). This will prevent the Barrel
Lids from rubbing against the housing and will
reduce friction. Check the stops periodically
during operation.
III. General Use
Note: These steps listed are for one barrel.
Both barrels should be used together.
If only one is to be “charged” (see step
2), use the other barrel on the
machine as well to help keep the first
in place. The barrels should be
mounted with the Knurled Nuts (24)
facing outward
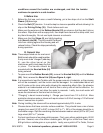
1. To open one of the Rubber Barrels (22), remove the Knurled Nut (24) and the Washer
(26). Next, remove the Barrel Lid (28)-see Figure A, right.
Note: It is imperative to load the Tumbler with the proper amount of materials, or the process
will not be successful, and the motor could be damaged. An underloaded barrel will
not lift rocks up the inner side walls allowing the cascading effect. Also, the abrasive
material in an underloaded unit will tend to form a slurry and will not be effective. An
overloaded Tumbler will not allow the rocks to cascade. Lastly, too much water will
cause the abrasives to float and not do their job.
2. “Charging” a barrel means loading it. Charge your barrel from 1/2 to 3/4 full. More
pointed or abrasive rocks or stones will require closer to 3/4 full, leaving a 1/2 full barrel
when it comes time to polish.
Note: During tumbling, the stones will be reduced approximately 20% in size.
3. Choose stones that have a similar surface condition. They should have a mix of sizes
ranging from small (3/16” to 3/8”) to large (3/4” to 1”). 25% of the stones should be in
the smaller range. Split the remaining volume between medium sized (3/8” to 5/8”) and
large sized (5/8” to 1”) stones.
4. For best results use a four step polish process. First, use a silicon carbide grain, 60-90
grit size. Second, use a fine silicon carbide grain, 220 grit or a little finer. Next, use a
600 grit silicon carbide grain or a pre-polish. Lastly, use a polish of Tin Oxide, Cerium