


SKU 42933 For replacement parts, please call 1-800-444-3353. Page 10
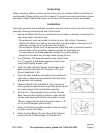
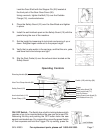
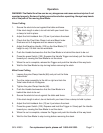
4. Set the Saw Blade angle to 0 degrees index position (perpendicular to the worktable).
5. Draw out the Saw Blade to mid-range on the Carriage Arm and lock in that position.
6. Turn the Elevating Handle to lower the Saw Blade so it just touches the plywood top.
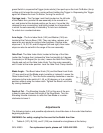
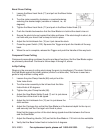
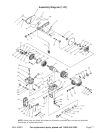
7. Place your hand on the Handle Assembly (87) and press the green ON button with the
other hand. Squeeze the Trigger (86) to start the motor.
8. With the same hand that you turned ON the machine, loosen the Carriage Lock Knob
and slowly move the Saw Blade back, cutting the rip fence; and then move it all the
way forward, cutting a groove into the entire depth of the plywood.
9. With the machine still running, turn the Elevating Handle 1/4 turn, lowering the Saw
Blade a little more. Pull the Handle back and forth again to cut the plywood groove a
little deeper. Tighten the Carriage Lock Knob again.
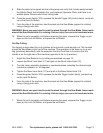
10. With the machine still running, loosen the yoke Clamp Handle (66) and pull out the
Yoke Index Knob and turn the yoke clockwise until it locks into the 90 degree.
This cuts a swing line into the worktable for in-ripping.
11. Once the quarter turn (swing line cut) is complete, lock the yoke Clamp Handle. With
the Saw Blade still turning, push on the Handle until the Saw Blade reaches the rip
fence, cutting the rip trough in the center of the worktable.
12. Turn the machine OFF and return the Saw Blade to the crosscut position. Lock the
Carriage Lock Knob.
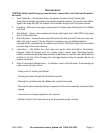
13. Turn the machine ON and rotate the Yoke counterclockwise to the out-rip position. This
cuts the swing line for out-ripping. Loosen the Carriage Lock Knob.
14. Lock the yoke Clamp Handle (66) and, with the Saw Blade revolving, push the Handle
back until the new groove matches the groove cut in step 11. Turn the machine OFF.
15. Return the Saw Blade to the crosscut position. Unlock the Carriage Lock Knob (74b)
and move the motor assembly to the rear position, behind the fence. Pull out the Bevel
Index Knob (74) and lock the Saw Blade at index position 60 degrees. Turn on
machine and pull the Handle forward. This will cut a kerf mark for bevel crosscuts. Turn
the machine OFF.
16. Lock the Carriage Lock Knob and start the motor. Pull the Carriage Arm Index Lock
Knob and move the Arm to the 45 degree right-hand miter position. This will cut a
groove for miter cuts. Turn the machine OFF.