


Page 9For technical questions, please call 1-888-866-5797.Item 69334
Operating Instructions
Read the ENTIRE IMPORTANT SAFETY INFORMATION section at the beginning of this
manual including all text under subheadings therein before set up or use of this product.
Tool Set Up
TO PREVENT SERIOUS INJURY FROM ACCIDENTAL OPERATION:
Release the Trigger and unplug the tool from its electrical outlet before adjusting the tool or
installing accessories.
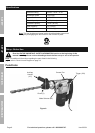
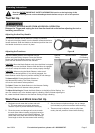
Adjusting the Auxiliary Handle
The Auxiliary Handle can be placed in a variety of positions.
To adjust the Auxiliary Handle, turn the Handle counterclockwise to
loosen the band. Slide the Handle to the desired position then turn
the Handle clockwise to secure it in place.
Adjusting the Functions
Adjust the Mode Selector to the desired function
before using the Rotary Hammer. Press the Release
Button and rotate the Mode Selector until it clicks in
place with the desired function at the Indicator.
CAUTION: Move the Mode Selector only when the Motor is stopped.
Attempting to move the Mode Selector while the Motor is engaged
will result in abrupt bit rotation and can cause property damage.
CAUTION: When moving the Mode Selector, make sure it
clicks into the desired position. If not actively engaged, the
Mode Selector could slip out of position resulting in tool damage.
To Hammer/Drill: Rotate the Mode Selector to
the Hammer/Drill setting. The Rotary Hammer
will revolve and hammer when powered.
To Chisel: Rotate the Mode Selector to the Hammer Setting.
The Rotary Hammer will hammer when powered.
To Adjust Chisel Angle: Rotate the Mode Selector to the Adjust Chisel Setting. You
can now rotate the bit to the desired angle for chiseling. When finished adjusting the
bit, rotate the Mode Selector to the Hammer Setting to begin chiseling.
Work Piece and Work Area Set Up
1. Designate a work area that is clean and well-
lit. The work area must not allow access by
children or pets to prevent distraction and injury.
2. Route the power cord along a safe route to reach
the work area without creating a tripping hazard or
exposing the power cord to possible damage. The
power cord must reach the work area with enough
extra length to allow free movement while working.
3. Secure loose work pieces using a vise or clamps
(not included) to prevent movement while working.
4. There must not be objects, such as utility lines,
nearby that will present a hazard while working.
Figure B
Auxiliary HandleBand Bracket
Release Button
Adjust Chisel Setting Indicator
Hammer
Setting
Hammer/
Drill Setting
Figure C
SAFETYOPERATIONMAINTENANCE SETUP