


WGI-F1-F2-F3-F4_INST_7-08
SIDE SLIDING DOOR WINDOW GUARD (F2-10):
1. A 14” long aluminum angle bracket is provided to attach to the rear vertical section of the
window frame.
2. This is necessary in order to screw on the rear vertical section of window guard.
3. Using four (4) #10 x ½” Sheet metal screws, attach angle bracket to frame through existing
bracket holes.
• The side of the bracket without holes should be flush with the inside of the window
frame.
• The window guard can now be installed as stated in section #4. See section 8 – door
window guard does not have cutouts for window latches (making them inoperable).
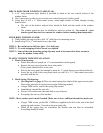
FIXED BODY WINDOW GUARD:
1. While holding the cage in place, drill 1/8” pilot holes for mounting screws.
2. Install using #10 x ½” sheet metal screws provided.
NOTE 1: Be careful not to drill into glass. (Use drill stop)
NOTE 2: To avoid stripping of holes, do not over tighten.
NOTE 3: Some of the trim mounting spring clips may need to be removed to allow screens to
meet the window frame easily.
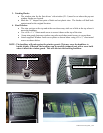
PLASTIC WINDOW TRIM INSTALLATION:
1. Plastic Trim Spacing:
• Plastic trim must be spaced out ½” to accommodate window guard.
• Remove the top screws from the lower trim panels.
(These panels should still be in the van).
• Pull out the lower panel just enough to insert the ½” nylon Spacers provided with the kit.
• Screw the top of the lower trim panels back on with #10 x 1 ¼” sheet metal screws also
provided with the kit.
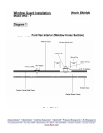
2. Metal Spring Clip Spacing:
• (See diagram 1 on page 4) There are metal spring clips that hold the upper trim in place.
These clips must also be spaced out using the following method.
• Using a 9MM socket, remove the spring clip and nut.
• Immediately reinstall the nuts only.
• Put two #10 washers onto the same bolt on top of the nut.
• Put spring clips on top of the washers.
NOTE: More washers can be used if needed. Make sure to leave sufficient threads for metric nut.
• Using a 7MM socket, put the M4 x 7MM nut (supplied in this kit) on the stud to the hold
spring clip and washers. Proceed to the next spring clip.
• When all the spring clips are reinstalled, the interior trim can then be reinstalled.
Everything should fit neatly.