


2
595-4991-07
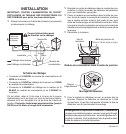
❒ Plug the sensor cord into the switch module. The sensor
cord's plug is polarized for proper installation.
❒ Place the Switch Module into the junction box. Before
mounting the fixture cover, make sure that the cord is flat
and smoothly placed against the wall so that the cord will
not be damaged when the fixture is re-installed. Make sure
that the protective sleeve over the sensor cord extends
slightly beyond the fixture cover.
❒ Reinstall the fixture.
Switch Module In Junction Box
Drip Loop
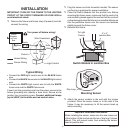
Mounting Sensor
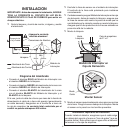
❒ Attach the sensor module to the wall with the screws
provided. Place the sensor below or to the side of the
fixture. It may be necessary to tilt the sensor head up
while mounting.
Typical Wiring
• Connect the RED light control wire to the BLACK fixture
wire.
• Connect the BLACK house wire to the BLACK light control
wire.
• Connect the WHITE light control wire to both the WHITE
house wire and the WHITE fixture wire.
If used, join the grounding wire from the power source to the
fixture grounding wire (usually a bare wire). Secure at the
junction box grounding screw. Connect additional lamps
(up to 500 W.) to the white and red control wires.
Light Control
❒ Remove the fixture and fixture strap (if present) and dis-
connect the wiring.
IMPORTANT: TURN OFF THE POWER TO THE LIGHTING
CIRCUIT AT THE CIRCUIT BREAKER OR FUSE BOX to
avoid electrical shock.
INSTALLATION
4" x 4"
Junction Box
Circuit
Breaker
or Fuse
Box
Turn power off before wiring!
Black
Switch
Black
Black
Black
White
White
White
Red
Wire Connectors
Fixture
House Wiring
Sensor Wiring
To Light
Fixture
Important Installation Information
When installing the sensor, make sure the wire comes out
of the bottom of the bracket and forms a “drip loop” (shown
above). This will prevent water from entering the sensor
head or junction box.