


12
Failure to observe this point may result in damage to the
tool or present a risk of accident. Accordingly, if neces-
sary, have the tool repaired at a Hilti service centre or
authorised Hilti repair workshop.
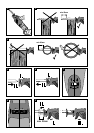
12. Always wear protective gloves and suitable
protective goggles when working as saw blades may
break or splinter.
Use clamps or a vice to hold the work. It is safer than
using your hand and it frees both hands to operate the
tool.
Form the habit of checking to see that keys and adjust-
ing wrenches are removed from the tool before switching
it on.
Preparation for use
It is essential that the safety precautions print-
ed in these operating instructions are read and observed.
The supply voltage must correspond to the infor-
mation on the type plate.
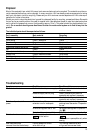
If extension cords are used: Only extension cords
of a type approved for the intended use and of adequate
cross section may be used. Failure to observe this point
may result in reduced performance of the tool and over-
heating of the cord. Damaged extension cords must be
replaced. The recommended cross-sections and max.
length for extension cords are:
Conductor cross-section
Mains voltage 1.5 mm
2
2.5 mm
2
100 V 20 m 40 m
230 V 50 m 100 m
Extension cables outdoors
Only suitable approved and correspondingly marked
cables may be used outdoors.
Always stay alert
Always concentrate on your work. Proceed logically and
do not use the tool when your full concentration is not
on the job.
Operation
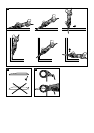
Inserting the blade
Use only blades with a standard
1
/
2
″ shank connection
end.
a) Unplug the supply cord from the mains socket
to prevent unintentional starting.
b) Check that the connection end of the blade is clean.
Always ensure that the blade clamping mechanism
is kept clean.
c) Turn the blade clamp locking sleeve in a counter-
clockwise direction. Insert the blade in the blade clamp
and press in the locking sleeve. Release the locking
sleeve until it is heard to engage. Check that it is held
securely by pulling on the blade Ẉ.
Note: If the saw blade cannot be inserted into the blade
clamp, turn the locking sleeve a little until the blade is
in the correct clamping position and then release the
locking sleeve.
Removing the insert tool
a) Unplug the supply cord from the electrical sock-
et to prevent unintentional starting.
b) Turn the locking sleeve and pull out the blade ẉ.
Wear protective gloves. The insert tool
may be very hot after long periods of use.
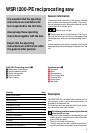
Sawing
Setting the stroke rate
The recommended stroke rate can be pre-selected by
turning the stroke rate adjusting wheel Ẋ to the desired
setting. When the operating switch is pressed the saw
will then run at the pre-selected stroke rate. The pre-
selected stroke rate remains almost constant, even under
load, thanks to the tool’s built-in constant-speed elec-
tronics, which also prevent overheating of the machine
when working with the pipe-cutting adaptor. The machine
switches itself off automatically as soon as the motor is
overloaded. It can be restarted by pressing the operat-
ing switch again. The recommended stroke rate settings
and information concerning the correct choice of saw
blade can be found in the information supplied with these
products and in the corresponding table of applications.
Stroke rate selection
(1 = low stroke rate, 4 = high stroke rate)
Material cut Recommended stroke rate
Wood 4
Wood with embedded nails 4
Drywall, interior finishing 3
Plastic 1–3
Steel 1–3
Non-ferrous metals 2–3
Aluminium 2–3
Stainless steel 1
The above settings are recommendations intended to
ensure optimum cutting performance. The optimum set-
ting may differ from these recommendations depending
on the saw blade used, the mains supply voltage and the
sawing technique employed. Use of the wrong stroke rate
setting may result in increased saw blade wear.