


10
English
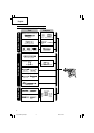
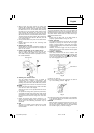
(2) Mount the core bit to the rotary hammer (Fig. 18).
(3) Insert the center pin into the guide plate until it
stops.
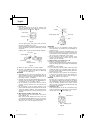
(4) Engage the guide plate with the core bit, and turn
the guide plate to the left or the right so that it
does not fall even if it faced downward. (Fig. 19).
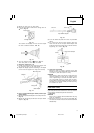
2. How to bore (Fig. 20)
(1) Connect the plug to the power source.
(2) A spring is installed in the center pin.
Push it lightly to the wall or the floor straight.
Connect the core bit tip flush to the surface and
start operating.
(3) When boring about 5 mm in depth the position of
the hole will be established. Bore after that removing
the center pin and the guide plate from core bit.
(4) Application of excessive force will not only expedite
the work, but will deteriorate the tip edge of the
drill bit, resulting in reduced service life of the
rotary hammer.
CAUTION
When removing the center pin and the guide plate,
turn OFF the switch and disconnect the plug from
the receptacle.
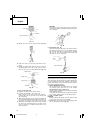
3. Dismounting (Fig. 21)
Remove the core bit shank from the rotary hammer
and strike the head of the core bit shank strongly
two or three times with a manual hammer holding
the core bit, then the thread becomes loose and
the core bit can be removed.
GREASE REPLACEMENT
This machine is full air-tight construction to protect
against dust incursion and to prevent lubricant leakage.
This machine can be used without grease replenishment
for an extended period of time. However, perform the
grease replacement to extend the service life. Replace
the grease as described below.
1. Grease Replacement Period
You should look at the grease when you change
the carbon brush. (See item 4 in the section
MAINTENANCE AND INSPECTION.)
Ask for grease replacement at the nearest authorized
Hitachi Service Center.
In the case that you are forced to change the grease
by yourself, please follow the following points.
2. How to replace grease
CAUTION:
Before replacing the grease, turn the power off and
pull out the plug from the receptacle.
(1) Disassemble the crank cover and thoroughly wipe
off the old grease inside. (Fig. 22)
Fig. 17
Core bit
Core bit shank
Thread
Fig. 18
Fig. 19
Core bit
Center pin
Guide plate
Core bit tip
Fig. 20
Fig. 21
Core bit shank
01e_DH28PC_ENG.p65 6/8/10, 16:4310