


7
English
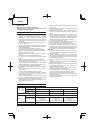
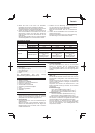
STANDARD ACCESSORIES
1 Nozzle (round) ............................................................. 1
2 Nozzle (fl at) ..................................................................1
3 Nozzle (curved surface) ...............................................1
4 Nozzle (glass protector) ...............................................1
5 Scraper (with grip) ........................................................1
6 Case .............................................................................1
Standard accessories are subject to change without notice.
APPLICATIONS
○ Peeling off paint
○ Softening adhesive
○ Removing putty from window frames
○ Forming resin pipes
○ Welding plastic
○ Heat wrapping using heat-shrink fi lm.
○ Soldering
○ Drying work
○ Defrosting work
PRIOR TO OPERATION
1. Power source
Ensure that the power source to be utilized conforms to the
power requirements specifi ed on the product nameplate.
2. Power switch
Ensure that the power switch is in the OFF position.
If the plug is connected to a receptacle while the power
switch is in the ON position, the power tool will start
operating immediately, which could cause a serious
accident.
3. Extension cord
When the work area is removed from the power source,
use an extension cord of suffi cient thickness and rated
capacity. The extension cord should be kept as short as
practicable.
BASIC FUNCTIONS
1. Switch Operations and Temperature Adjustments
(Fig. 1, 2)
Press the switch upward or downward to enable
continual operations even when your fi nger is removed.
Press the protrusion lightly to return the switch to the
central position and turn off the power.
The wind temperature and wind volume can be adjusted
in two stages depending on which way the switch is set.
Switch [I] position:
110 V: 250°C (wind volume 0.25 m
3
)
120 V to 127 V: 350°C (wind volume 0.25 m
3
)
220 V to 240 V: 350°C (wind volume 0.25 m
3
)
Switch [II] position:
110 V to 127 V: 500°C (wind volume 0.5 m
3
)
220 V to 240 V: 600°C (wind volume 0.5 m
3
)
Press the quick cooling button and press the switch to
blow warm air at approximately 50 degrees Celsius for
each of the switch’s wind volumes.
This is used to quickly cool material that is heat-
warping and to cool the nozzle when it reaches high
temperatures after using the tool.
2. Using the Hook (Fig. 3)
CAUTION
○ When pointing the tool upward to work, make sure that
it is placed on a stable block that does not tilt.
○ Do not hang the tool from your wrist or waist when
moving around with the nozzle still hot.
Support the tool fi rmly when pointing the heat-wind release
nozzle upward.
Also, it is possible to suspend the tool from a wrist, etc.,
with a cord to prevent it from being dropped when working
in high locations, etc.
3. Attaching the Nozzle (Fig. 4)
CAUTION
The nozzle is extremely hot immediately after use, so
do not touch it.
NOTE
Make sure you do not drop the nozzle.
Replace the nozzle for a type that is suited to the job in hand.
Insert the nozzle supplied fi rmly into the hot wind release
nozzle until it can go no further.
4. Temperature Settings
WARNING
○ Do not use the tool in the vicinity of volatile substances
(thinner, gasoline, etc.)
○ Do not bring the hot wind release nozzle in close
contact with your hands or face during use.
The nozzle is extremely hot immediately after use, so
do not touch it.
Set the temperature in consideration of the article to be
heated.
Also, pay attention to the surrounding material that will be
heated at the same time.
First of all, apply the hot wind from a distance while checking
that there are no changes in the article being heated, and
then move it closer until it reaches an appropriate distance.
Heating infl ammable substances
(paper, wood, plastic, etc.)
Set the switch to the [I] position and apply the heat with
the nozzle at least 10cm away from the article being
heated.
Gently move the tip of the nozzle up, down, left and right
to apply the heat.
Applying heat constantly to one location may result in
malformation or the outbreak of smoke.
Heating non-fl ammable substances
(metal, stone, concrete, etc.)
Set the switch to the [I] position, and if there are no
problems, move it to the [II] position.
Apply the heat with the nozzle at least 5cm away from
the article being heated.
Holding the nozzle too close may result in the tool
overheating, leading to malfunctions.
WORK EXAMPLE
CAUTION
Parts of the nozzles supplied are sharp, so use gloves
when removing them from the case and when attaching
or detaching them.
Select the nozzle in consideration of the shape of the
article being heated and the area being heated.
1. Peeling off paint (Fig. 5)
Use nozzle (fl at) or nozzle (round) to soften the paint
with the hot wind, and then remove it with the scraper
supplied.
Note that heating the paint too much may result in it
scorching and becoming harder, making it diffi cult to
scrape off .
2. Softening adhesive (Fig. 6)
Use nozzle (fl at) or nozzle (round) to soften the surface
and make it easy to peel, and then pull up one of the
edges, blow heat underneath it and gently peel it off so
that none of the adhesive remains.